
When it comes to home improvement projects that combine practicality, aesthetic appeal, and functionality, there is no better investment than a DIY gravel driveway.
Whether you are tired of dealing with muddy puddles, erosion, or just want to upgrade your curb appeal without breaking the bank, gravel driveways are the perfect solution.
The beauty of a gravel driveway lies in its versatility: you can customize it with different textures, colors, and borders to match your personal style and landscape.
I personally decided to dive into the world of DIY gravel driveway ideas, and I’m excited to share how this project turned out to be not only budget-friendly but also incredibly rewarding.
With very simple tools and elbow grease, as well as using creative thinking, you can bring this chic feature that is robust and eco-friendly into your house, adding value to it. Let’s see the road ahead on turning this DIY dream into reality!
My DIY Cobblestone and Gravel Driveway
I’ve always loved cobblestones; they have such a timeless quality to them. I wanted something that was both elegant and practical.
I wanted to have a driveway that would really drain well, look beautiful, and last for centuries. This design also made sense perfectly because my driveway tends to pool with water whenever there is heavy rain.
Cobblestones along the edges would not only give it that sophisticated touch, but the gravel would allow rainwater to flow easily and prevent erosion. Plus, it was a perfect DIY project to tackle over a few weekends!
Materials I Used:
- Cobblestones (to line the edges of the driveway)
- Gravel (for the main surface, I went with a mix of small decorative stones)
- Crushed stone (for the base layer)
- Weed barrier fabric (to avoid weed growth)
- Plate compactor (for compacting the surface)
- Shovel, rake, and wheelbarrow (for moving and spreading materials)
- Concrete or mortar (optional, to secure cobblestones)
Planning and Preparing the Area

I began by laying out the area for the driveway. Using a garden hose, then mapped out a straight line with a slight curve at the end to give it some character.
Then we used wooden stakes to mark the width of the driveway, making sure everything was straight by using a string line. Before starting work, we measured the slope of the driveway to ensure it was slight enough for proper drainage.
Then using a simple level and a string to check if the slope was correct. This was a very important part of the planning phase because good drainage was one of the main reasons we chose this project.
Excavate and Prepare the Base
With the area marked out, I put on my shovel and started to dig out my driveway. Since I wanted this to be about 68 inches deep, the crushed stone base and gravel layer would be able to fit exactly.
Once all the dirt is removed, using a plate compactor, it is leveled well to ensure firm ground to prevent everything from going astray. The next step was to lay down a base of crushed stone. We choose a high-quality crushed stone that would serve as a sturdy gravel base.
Using my rake, I spread the stone evenly and compacted it with the plate compactor. This was one of the most satisfying parts of the process, as I could feel everything firming up, ready to hold the gravel in place.
Install the Weed Barrier Fabric
I did not want weeds to sprout through my gravel, so I installed a high-quality weed barrier fabric. I spread the fabric across the entire driveway area, overlapping the edges by a few inches to ensure no gaps.
This was a relatively simple step, but it was essential for long-term maintenance. The fabric allows rainwater to flow through but blocks weeds from making an appearance.
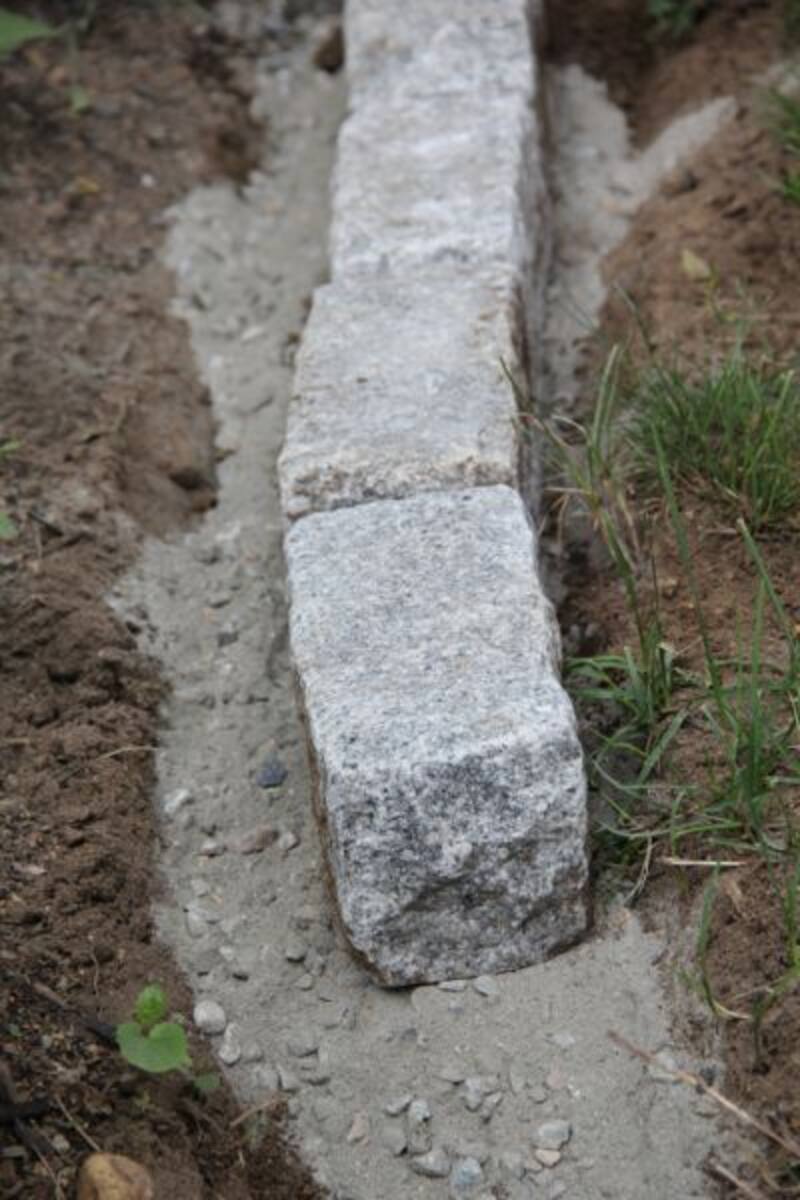
Laying the Cobblestones
It was fun laying the cobblestones. I decided on a classic, simple straight-line pattern for borders as it set well with my driveway’s natural flow.
So first we placed the cobblestones along the edges of the driveway, ensuring that they were butt tight to one another. To keep them in place, we used some mortar between a few of the stones.
Then we mixed the mortar and applied it with a trowel, pressing the cobblestones into the mixture for extra stability. Cobblestones were heavy, so I had to take my time placing them.
I tapped them into position with a rubber mallet, ensuring everything was straight and secure.
Fill the Center With Gravel
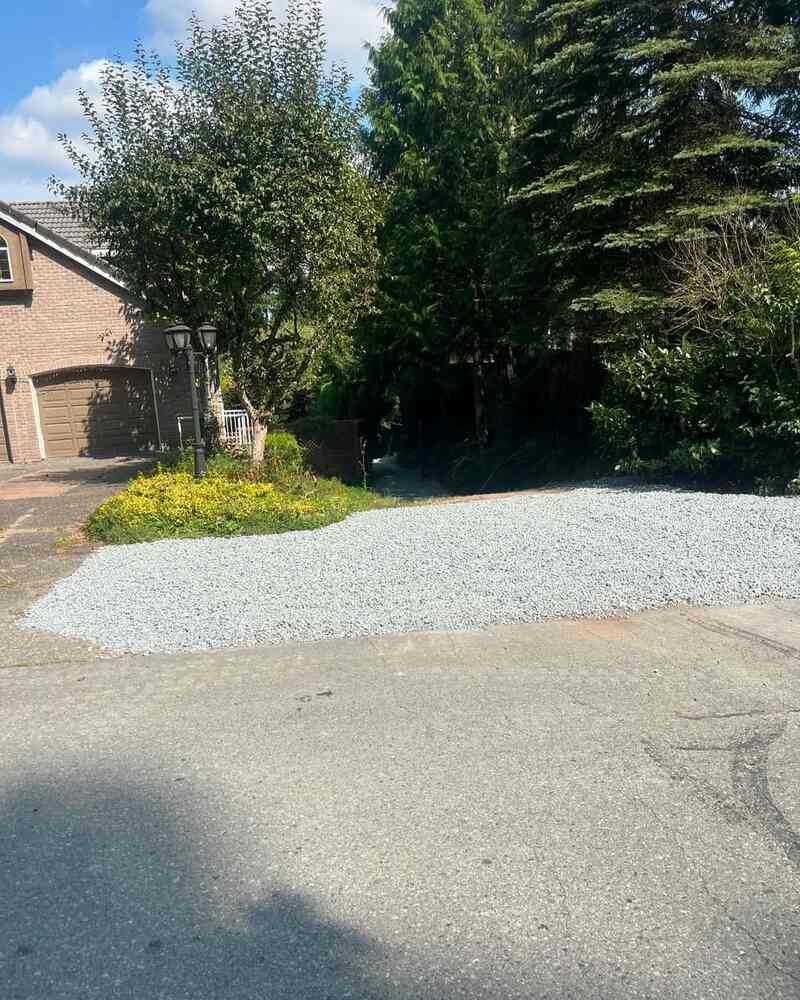
Once the cobblestones were in place, I then proceeded to fill the center of the driveway with gravel. I decided to use a variety of small, ornamental gravel because it was the ideal combination of color and texture to go well with the cobblestones.
It’s also great for drainage, which was important for me. I spread the gravel evenly across the entire driveway, using a rake to ensure the surface was level.
The process wasn’t too difficult, but it did take some time to get everything spread out perfectly. Afterward, I compacted the gravel with the plate compactor, which really helped lock everything in place and prevent it from shifting over time.
Finishing Touches
The last touch to complete the driveway was adding the landscape edging along the cobblestone border so that the gravel didn’t spill over. I utilized simple wooden boards anchored into the ground with stakes.
These wooden boards not only contained the gravel but also gave the driveway a polished look. The driveway looked exactly as I had envisioned: elegant, functional, and low-maintenance.
Maintenance and Care
Now that I have a solid driveway, it’s upkeep. To get the cobblestone and gravel driveway to appear its best, there will be periodically topping off with gravel and tidying up weeds and debris from the cobblestone borders.
Every few months,we plan on running my leaf blower over the top of the gravel to keep it neat and trim any grass that crept into those edges.
Conclusion
Making a do-it-yourself gravel driveway was by far the most useful and satisfying project I have completed to date. Not only did it enhance the overall look of my home, but it also solved some practical issues like water drainage and maintenance.
Whether you’re inspired by the timeless elegance of cobblestone, the eco-friendliness of grass and gravel combinations, or just the versatility of decorative gravel, the possibilities are endless.
A gravel driveway is an easy, cost-effective solution that will pay off in the long run if you have the right materials and a clear plan.
So, if you are looking to enhance your home’s curb appeal, reduce maintenance, and add a personal touch, I would recommend diving into the world of DIY gravel driveway ideas. It is more than just a useful addition it is an opportunity to show off your creativity and make your house cozier and more useful!