
Roman clay fireplaces are having a major moment right now, and it’s easy to see why. This ancient technique creates a beautiful matte finish that adds instant warmth and character to any room.
The soft, organic texture feels so much more interesting than standard paint or tile.
If you’ve been eyeing this look but worried about the cost of hiring professionals, you’re in the right place. We’ve helped hundreds of homeowners transform their fireplaces using simple DIY methods that actually work.
This guide walks you through everything you need to know. You’ll get step-by-step instructions for applying Roman clay yourself, plus creative design ideas to make your fireplace the focal point of your room.
We’ll also share the mistakes to avoid and the tools that make the biggest difference.
By the end, you’ll have the confidence to tackle this project and create a fireplace that looks like it cost thousands.
What Is a Roman Clay Fireplace?

Roman clay is a natural wall finish made from crushed marble, limestone, and mineral pigments. Think of it as paint’s sophisticated cousin. Unlike lime wash, which can look chalky, Roman clay creates a smooth yet textured surface that feels substantial to the touch.
It’s different from regular plaster too. Plaster needs multiple coats and professional skills. You can apply it in one or two coats with basic tools.
Why homeowners choose Roman clay for fireplaces:
- Zero VOCs means safer air quality
- Fire-resistant properties for added safety
- Won’t crack like paint when exposed to heat changes
- Creates depth that flat paint simply can’t match
- Lasts for years without touch-ups
Roman clay works best on drywall, concrete, brick, and stone. Skip it on glossy surfaces or areas that get wet regularly.
Living rooms and family rooms are perfect spots. The finish reflects light beautifully, making spaces feel larger and more inviting.
Inspiring Roman Clay Fireplace Design Ideas
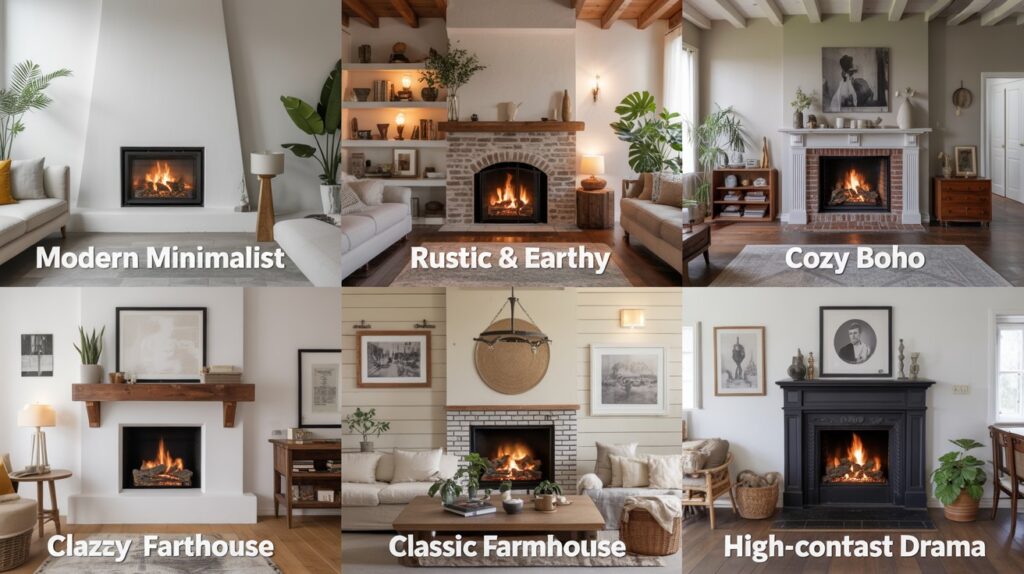
Modern Minimalist Look
Soft grays and warm whites create clean lines without feeling cold. I recommend choosing clay with subtle undertones – maybe a hint of beige or mushroom. The matte finish eliminates glare from overhead lighting.
Pair with simple mantel styling. A single piece of art or a small succulent works perfectly.
Rustic & Earthy Vibes
Terracotta and burnt orange tones bring warmth instantly. Apply the clay with slightly uneven strokes to create natural texture variations. This mimics how ancient walls developed character over time.
Add rough-hewn wood accents or wrought iron tools for authentic feel.
Cozy Boho Feel
Dusty rose and sage green clays create that lived-in comfort. Layer in woven baskets, vintage brass candlesticks, and dried pampas grass. The clay’s organic texture complements natural materials beautifully.
Classic Farmhouse Style
Creamy off-whites and soft grays never go out of style. If you have shiplap nearby, choose a clay shade that’s one tone deeper than your wood finish. This creates subtle contrast without competing.
Mason jars filled with cotton stems complete the look.
High-Contrast Drama
Deep charcoal or rich brown clay makes a bold statement. This works especially well in rooms with white trim or light furniture. The dark fireplace becomes your room’s anchor point.
Balance the darkness with metallic accessories in brass or copper.
Tools and Materials You’ll Need
Roman Clay Product, Portola Paints, and Bauwerk offer quality options. You’ll need about one quart for an average fireplace surround.
Application Tools:
- 4-inch natural bristle brush (for smooth application)
- Plastic trowel or putty knife (for texture)
- Small artist brush (for detailed areas)
Prep Materials:
- High-adhesion primer (if painting over glossy surfaces)
- Canvas drop cloths (plastic ones get slippery)
- Painter’s tape
- 220-grit sandpaper
Cleaning Supplies:
- TSP cleaner or degreaser
- Microfiber cloths
- A bucket for water
Most of these items you probably have already. The clay itself is your biggest investment at $80-120 per quart.
Step-by-Step DIY Application Guide
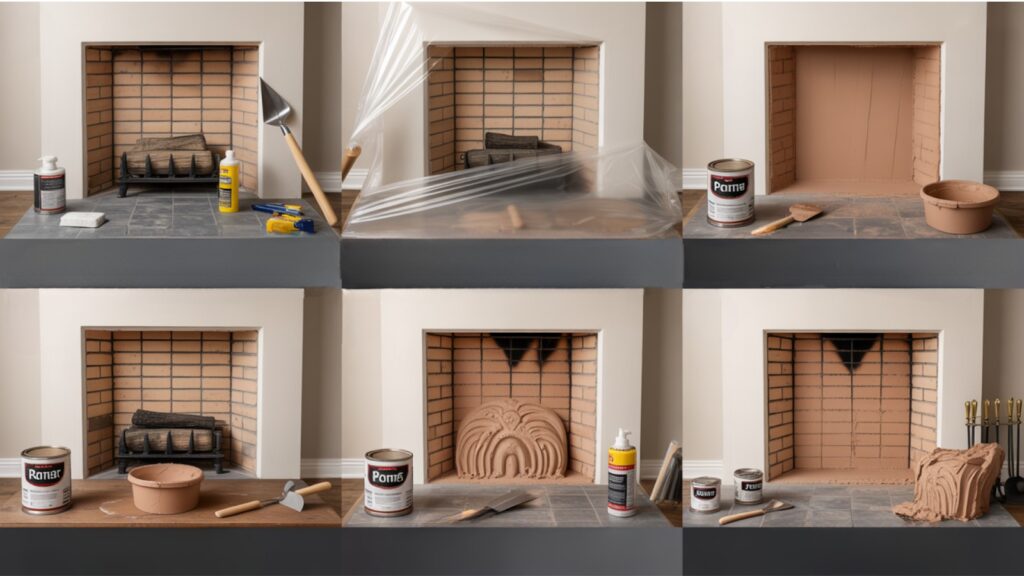
1. Prep Your Fireplace Surface
Turn off your fireplace and let it cool completely. I mean, completely – wait 24 hours if you used it recently.
Clean with TSP solution to remove soot and oils. Scrub gently with a microfiber cloth. Rinse with clean water and let dry.
Fill any cracks with spackling compound. Sand smooth once dry. Wipe away all dust.
2. Protectthe Surrounding Area
Lay drop cloths extending 3 feet from your work area. Roman clay spatters more than regular paint.
Tape off trim, hearth edges, and any areas you want to keep clean. Press tape edges firmly to prevent seepage.
Remove or cover nearby furniture. Trust me on this one.
3. Apply Base Coat or Primer
Most surfaces don’t need primer with Roman clay. But if you’re covering dark paint or glossy finishes, prime first.
Use a high-adhesion primer. Apply thin, even coats. Let dry completely before proceeding.
4. Apply Roman Clay
Open your container and stir gently. Don’t shake – this creates air bubbles.
Start at the top and work down. Load your brush with clay, then apply in overlapping X-patterns. This prevents streaking.
For a smooth finish: Use long, even strokes in one direction for your final pass.
For a textured look: Use your trowel to create slight variations. Work in small sections before the clay starts drying.
Keep a damp cloth handy. Wipe your tools every few minutes to prevent buildup.
5. Let It Dry + Optional Second Coat
The first coat takes 2-4 hours to dry completely. Don’t rush this step.
Most fireplaces look great with one coat. If you want deeper color or more coverage, apply a second thin coat after the first is totally dry.
6. Finishing Touches
Remove the tape while the clay is slightly damp for clean lines. Wait too long and you might pull off some clay.
Buff lightly with a soft cloth once fully cured (about 24 hours). This brings out the natural sheen.
Clean your brushes immediately with warm water. Roman clay is much harder to remove once it dries.
Common Mistakes to Avoid
- Don’t apply Roman clay over wallpaper or peeling paint because it won’t stick properly, and you’ll have bigger problems later.
- Never skip the prep work since dirty or uneven surfaces will show through the finish, so take time to clean and patch properly.
- Avoid overworking the material because Roman clay has a working time of about 15 minutes, and additional brushing after that creates streaks.
- Don’t ignore drying times since each coat needs to cure fully before you add another, and rushing creates uneven color and texture problems.
- Avoid using synthetic brushes because they leave streaks in Roman clay, while natural bristles or trowels work much better.
- Don’t work in sections that are too large, since it’s better to do three small areas perfectly than one large area poorly.
- Remember to keep your tools clean by wiping brushes every few minutes to prevent clay buildup that creates streaks.
Conclusion
Your fireplace can go from ordinary to stunning with Roman clay, and you don’t need professional skills to make it happen. The best part? This isn’t just another trendy finish that’ll look dated in two years. Roman clay has been around for centuries because it simply works.
Take your time with the prep work, choose a color that speaks to you, and trust the process. Even if your first attempt isn’t perfect, the organic nature of Roman clay means small imperfections add character.
Start this weekend if you’re ready. Your fireplace will become the room’s focal point, and guests will assume you hired expensive contractors. But you’ll know the truth – you created something beautiful with your own hands.
The transformation is worth every minute you put into it.
Frequently Asked Questions
How much does Roman clay cost compared to regular paint?
Roman clay costs about $80-120 per quart, which covers roughly 150 square feet. That’s 3-4 times more than regular paint, but you typically only need one coat, and it lasts much longer without touch-ups.
Can I apply Roman clay directly over existing paint?
Yes, as long as the paint isn’t peeling or glossy. Clean the surface thoroughly first. If you’re covering dark colors or shiny finishes, use a high-adhesion primer before applying the clay.
How long does Roman clay take to fully cure?
Roman clay dries to the touch in 2-4 hours, but takes 24-48 hours to fully cure. Don’t add a second coat or seal it until it’s completely dry. Temperature and humidity affect drying times.
Is Roman clay safe to use around fireplaces?
Yes, Roman clay is naturally fire-resistant and contains no harmful chemicals. It handles heat changes better than regular paint, which can crack or peel near fireplaces.
What happens if I mess up the application?
Roman clay is forgiving. If you catch mistakes while it’s still wet, simply smooth them out with your brush or trowel. Once dry, you can sand lightly and reapply to problem areas.