
The kitchen island has become the heart of modern homes. In 2025, homeowners want more than just extra counter space. They’re looking for islands that make a statement while solving real problems.
Your island’s back panel offers huge potential. This often-overlooked area can transform your entire kitchen. It provides storage, style, and functionality all in one spot.
Many people struggle with bland, boring island backs. You end up with wasted space and missed opportunities. The good news? Small changes can create big impact.
This guide shares 39 practical ideas for your island back panel. You’ll find options for every budget and skill level. From simple fixes to complete makeovers, we cover it all.
Ready to turn that blank space into your kitchen’s best feature? Let’s explore these game-changing ideas together.
Why Kitchen Island Back Panels Deserve Attention
Your kitchen island back panel does more heavy lifting than you might think. This simple feature can make or break your entire kitchen design. Yet most homeowners treat it as an afterthought.
Visual Impact and Style Unity
In open-plan homes, your island back panel acts as a focal point. Guests see it the moment they walk into your space. It ties your kitchen to the rest of your home.
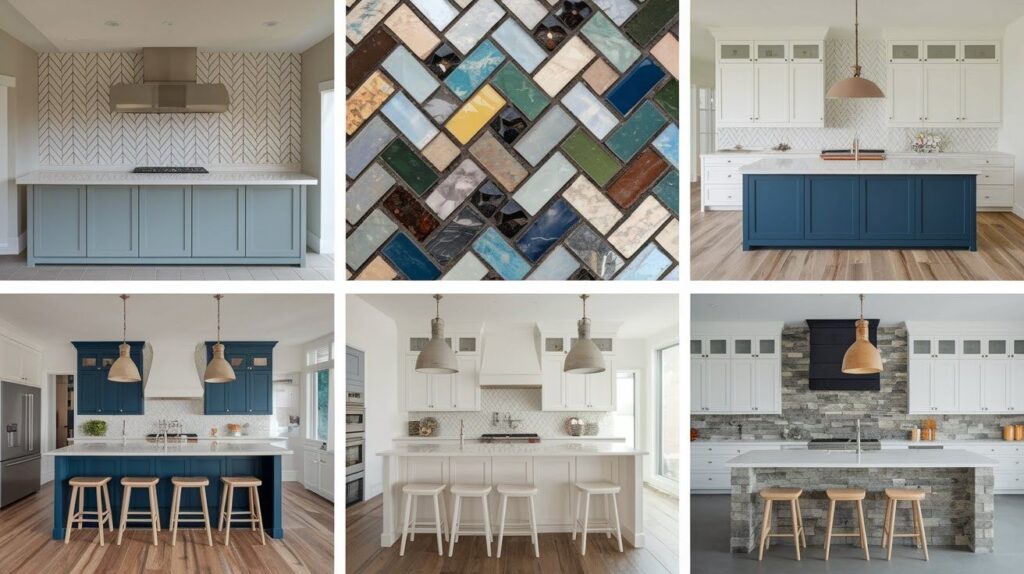
The right back panel supports your chosen style:
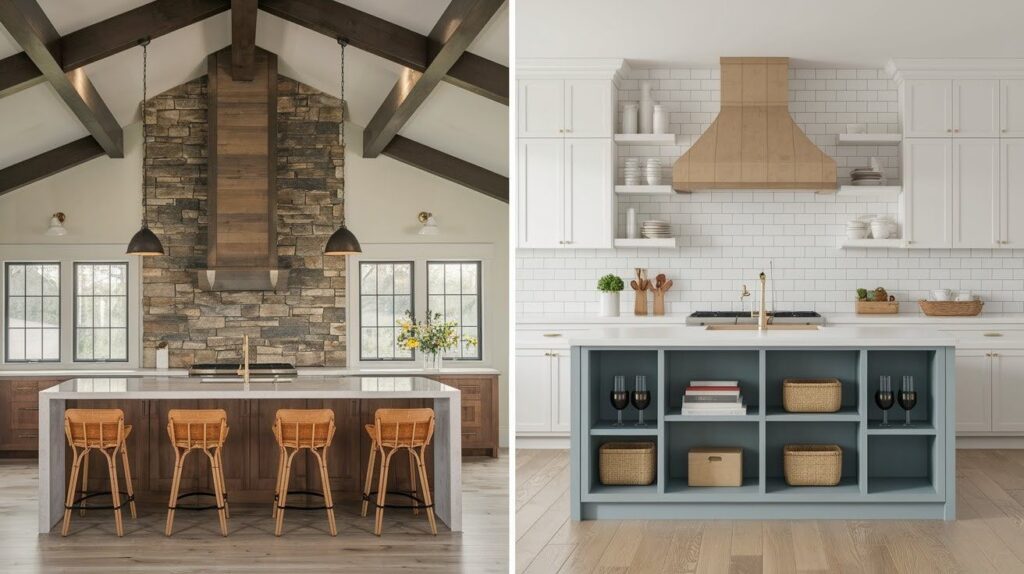
- Rustic kitchens benefit from reclaimed wood or stone
- Modern spaces shine with clean lines and bold materials
- Minimalist designs work best with simple, uncluttered panels
When your island back matches your overall theme, everything feels intentional. The whole room looks pulled together instead of random.
Smart Function Meets Form
Back panels aren’t just about looks. They solve real kitchen problems every day.
Storage Solutions Add shelves, hooks, or built-in cubbies. Store cookbooks, utensils, or everyday items within arm’s reach. No more digging through crowded drawers.
Easy Appliance Access Built-in outlets let you use small appliances without cords stretched across counters. Coffee makers, blenders, and mixers get dedicated spots.
Custom Features for Your Life Families with kids might add low hooks for backpacks. Wine lovers could install a small rack. The options match how you actually use your kitchen.
39 practical ideas for your island back panel
When it comes to designing the back panel for your kitchen island, there are a number of approaches you can take.
Wood-Based Designs & Textures
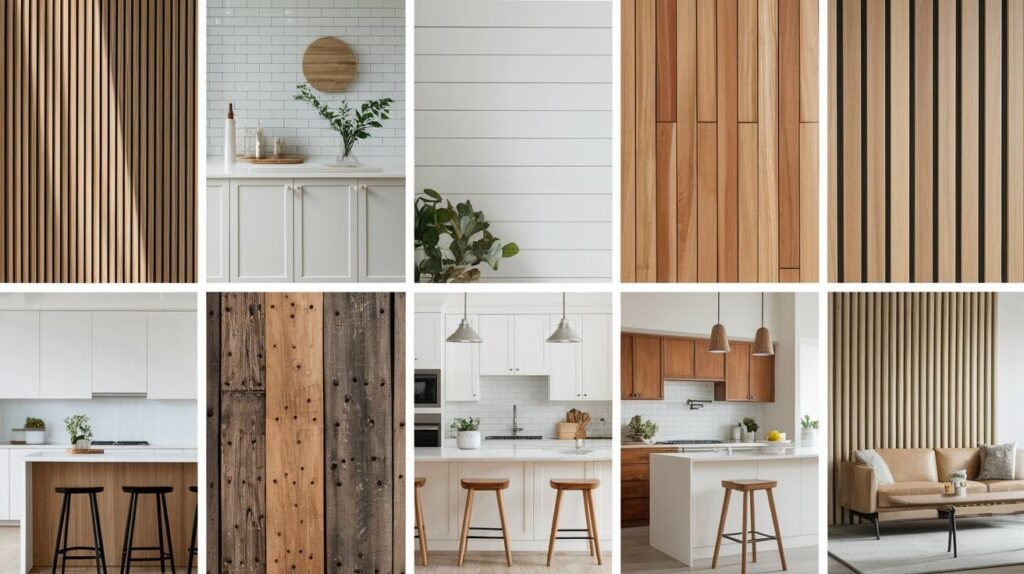
Enhance your kitchen’s warmth and character with these seven stylish wood panel ideas, from sleek flat panels to rustic reclaimed finishes.
1. Wood-Based Panel Designs
Wood brings instant warmth to any kitchen. These six approaches work with different budgets and skill levels. Each option creates a unique look while adding natural beauty to your space.
2. Fluted and Reeded Wood Panels
These panels feature thin vertical grooves that catch light beautifully. The linear pattern adds texture without overwhelming your design. Oak and walnut work especially well for this treatment.
Installation tip: Run the grooves vertically to make your ceiling look higher. Horizontal grooves can make the space feel wider instead.
3. Shiplap and Beadboard Styles
Classic farmhouse looks never go out of style. Shiplap offers clean horizontal lines with subtle shadow gaps. Beadboard provides more detailed texture with narrow vertical planks.
Both options paint easily if you want to change colors later. White and cream remain popular, but dark colors create dramatic contrast.
4. Sleek Flat-Panel Wood
Sometimes simple works best. Smooth wood panels let the natural grain take center stage. This approach suits contemporary and transitional kitchens perfectly.
Choose woods with interesting grain patterns like cherry or maple. The lack of added texture means the wood itself becomes the star.
5. Reclaimed or Rustic Wood Finishes
Old barn wood and weathered planks tell stories. Each piece brings character through natural wear, nail holes, and color variation. No two installations look exactly the same.
Clean and seal reclaimed wood properly before installation. This prevents splinters while preserving the authentic worn appearance.
6. Vertical or Slatted Scandinavian Wood Styles
Thin wood slats create an airy, modern feel. Leave gaps between slats for visual lightness. This style works especially well in smaller kitchens where heavy materials might feel overwhelming.
Light woods like pine or birch enhance the Scandinavian aesthetic. The clean lines complement minimalist design principles.
7. Mixed Wood Tones for Layered Warmth
Combine different wood species for rich, complex looks. Pair light and dark tones, or mix smooth and textured surfaces. The key is maintaining some common element that ties everything together.
Start with two wood types maximum. More than that can look chaotic rather than intentional.
Painted & Colorful Finishes
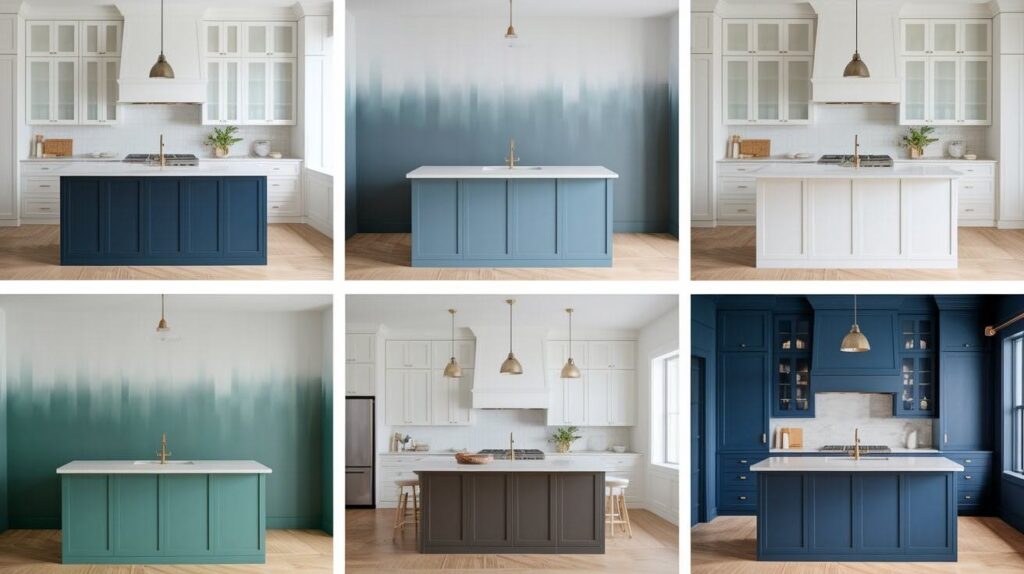
Add personality and depth to your kitchen with painted island panels ranging from soft neutrals to bold hues and ombre blends for a stylish, customizable design statement.
8. Painted and Colorful Panels
Paint transforms any surface instantly. Your island back panel offers the perfect canvas for color experiments. These approaches let you express personality while staying practical.
9. Contrasting Paint Colors
Make your island pop by choosing colors that stand out from your main cabinets. If your kitchen features white cabinets, try deep blue or charcoal gray on the island back.
The contrast creates visual interest without requiring expensive materials. You can always repaint if you want a change later. Test colors in different lighting before committing to the full project.
10. Ombre or Two-Tone Finishes
Blend colors from light to dark for a modern ombre effect. Start with white at the top and fade to gray at the bottom. This technique adds depth and sophistication.
Two-tone panels split the difference with a clean line between colors. Paint the top half light and the bottom half dark. The horizontal division can make your kitchen feel wider.
11. Light Green and Other Soft Hues
Gentle colors bring calm energy to busy kitchens. Sage green, dusty blue, and warm beige create relaxing atmospheres. These shades work well with natural wood and stone materials.
Soft colors reflect light better than dark ones. This makes your kitchen feel brighter and more open. They also hide fingerprints and daily wear better than pure white.
12. Bold Color Choices (Teal, Navy, Black)
Strong colors make confident statements. Deep teal brings oceanic richness. Navy blue feels classic and timeless. Matte black creates dramatic modern appeal.
Bold colors work best in kitchens with plenty of natural light. They can overwhelm smaller spaces, so consider your room size first. Balance strong panel colors with lighter elements elsewhere.
13. Off-White and Muted Neutral Accents
Cream, mushroom, and greige offer subtle alternatives to stark white. These colors provide warmth without competing with other design elements. They complement both cool and warm color schemes.
Neutral panels let other features shine. Your countertops, backsplash, and hardware become the focus. This approach works well when you have beautiful materials worth highlighting.
Decorative & Textured Surfaces
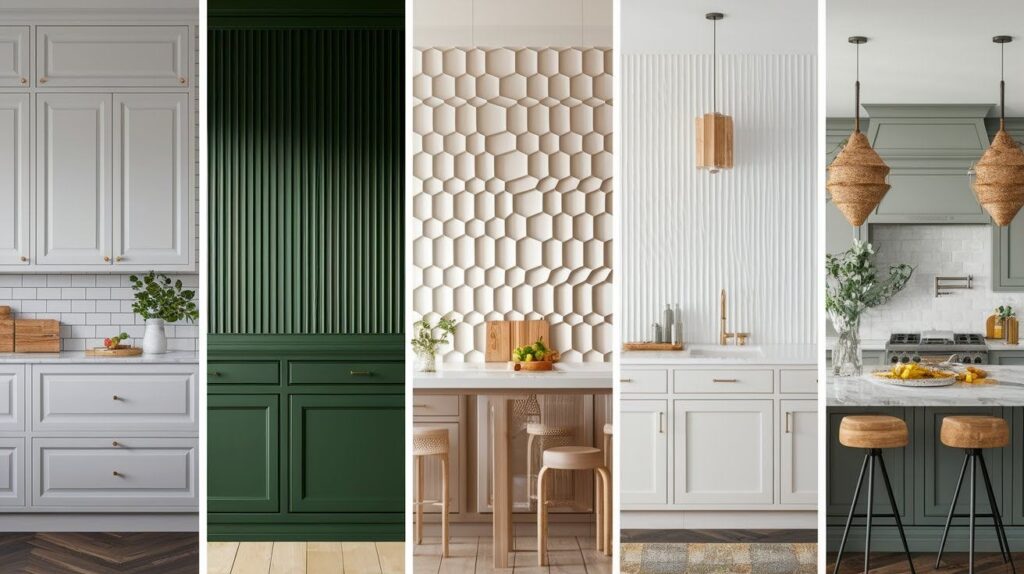
Elevate your island’s visual appeal with textured paneling from classic millwork to bold fluted designs and modern geometric patterns that adds depth, charm, and standout style.
14. Textured and Decorative Paneling
Texture adds personality and visual weight to your island back panel. These treatments create focal points that draw the eye and start conversations. Each option brings different levels of complexity and impact.
15. Molded or Paneled Millwork
Traditional raised panels bring classic sophistication to any kitchen. The dimensional surfaces create interesting shadow play throughout the day. Choose from simple flat panels with raised edges or more complex cathedral-style designs.
Square and rectangular panel configurations work in most kitchens. Size your panels proportionally to your island height. Larger panels suit bigger islands, while smaller panels work better on compact designs.
16. Ribbed or Fluted Texture in Bold Tones
Vertical ridges create striking linear patterns. Paint these textures in strong colors like forest green or burgundy for maximum impact. The ridges catch and reflect light differently than smooth surfaces.
Spacing between ridges affects the overall look. Narrow gaps create fine texture, while wider spacing makes bolder statements. Consider your kitchen’s scale when choosing ridge width.
17. Geometric and Carved Surfaces
Hexagons, diamonds, and other shapes add modern flair. CNC-cut panels create precise patterns impossible to achieve by hand. Popular options include honeycomb designs and interlocking triangles.
Start with simple geometric patterns if you’re new to this approach. Complex designs can overwhelm smaller kitchens. The key is choosing patterns that complement your existing style rather than fighting it.
Consider how the pattern will look with your cabinet hardware and other kitchen details. Too many competing patterns create visual chaos.
18. Wainscoting and Decorative Trim
Lower panels with trim caps bring traditional charm. Board-and-batten styles feature vertical boards with narrow trim strips covering the joints. This creates clean, structured appearances.
Height matters with wainscoting. Standard chair rail height (32-36 inches) works well for most islands. Adjust based on your island’s proportions and your kitchen’s ceiling height.
Paint the panels and trim in coordinating colors. White panels with darker trim create classic contrast. Monochromatic schemes feel more contemporary and streamlined.
Tile, Stone & Brick Enhancements
Enhance your island’s durability and design with tile and stone panels ranging from colorful mosaics and backsplash-matching tiles to rustic brick and luxurious marble for a stunning, low-maintenance finish.
19. Tile-Enhanced Back Panels
Tile brings durability and easy maintenance to your island back panel. These hard-wearing surfaces handle kitchen messes while adding color and pattern. From simple subway tiles to intricate mosaics, options suit every style and budget.
20. Patterned Ceramic and Porcelain Tile
Modern tiles offer endless design possibilities. Herringbone patterns create movement and interest. Chevron layouts add dynamic angles. Large format tiles with subtle patterns keep things clean and simple.
Porcelain resists stains and scratches better than ceramic. Both materials come in countless colors and finishes. Matte surfaces hide fingerprints while glossy tiles reflect light and feel more formal.
21. Mosaic and Glass Tile Inlays
Small tiles create intricate patterns impossible with larger formats. Glass mosaics catch light beautifully and come in brilliant colors. Stone mosaics bring natural texture and earthy tones.
Mix different materials within one mosaic for rich, layered looks. Combine glass with stone or metal for unique effects. Keep color palettes cohesive to avoid busy, chaotic appearances.
22. Backsplash-Matching Tile Panels
Extend your backsplash tile to the island back for seamless flow. This approach creates visual continuity throughout your kitchen. It also simplifies material selection and ordering.
Match the tile exactly or choose a complementary pattern in the same color family. Subway tiles on the backsplash might pair with larger format tiles on the island back. Keep the same color but vary the size or layout.
This strategy works especially well in open kitchens where the island sits prominently in view. The repeated material ties different areas together naturally.
23. Stone and Brick Panel Designs
Natural materials bring timeless appeal to kitchen islands. Stone and brick add weight and substance that other materials can’t match. These options work especially well in traditional and transitional kitchens.
24. Ledgestone and Stacked Stone Looks
Real stone creates authentic texture and color variation. Each piece is unique, with natural edges and surfaces. Ledgestone panels feature thin, rectangular stones stacked in horizontal rows.
Installation requires proper wall support since stone adds significant weight. Natural stone needs sealing to prevent stains and water damage. Plan for this ongoing maintenance when choosing real stone.
25. Faux Brick or Whitewashed Brick Panels
Brick brings farmhouse charm and industrial character. Thin brick veneer panels install directly over existing surfaces. No structural changes needed for most installations.
Whitewashed brick softens the rustic look while keeping authentic texture. Paint thinned with water and applied unevenly creates this weathered appearance. Red brick painted white gives classic farmhouse style.
26. Marble or Marble-Look Panels
Marble brings luxury and sophistication to any kitchen. Natural stone features unique veining patterns that create visual interest. Popular choices include Carrara, Calacatta, and Statuario marbles.
Natural marble requires regular sealing and careful cleaning. Acidic substances like lemon juice can etch the surface permanently. Consider this maintenance before choosing real marble.
Marble-look quartz and porcelain panels offer similar beauty with better durability. They resist stains and scratches while maintaining consistent patterns. Many options closely replicate.
Storage & Utility Features

Maximize your kitchen island’s function with storage-integrated back panels featuring built-in cabinets, open shelves, and hidden appliance garages for clutter-free convenience and seamless style.
27. Storage-Integrated Back Panels
Smart storage turns wasted space into working solutions. Your island back panel can hold everything from cookbooks to small appliances. These built-in options keep counters clear while maintaining clean lines.
28. Built-in Cabinets and Hidden Drawers
Traditional cabinets blend seamlessly with your existing kitchen design. Match door styles and hardware for consistent looks. Deep drawers work better than shelves for heavy items like stand mixers and food processors.
Soft-close hinges and drawer slides prevent slamming. This matters more on islands since people work around them constantly. Quality hardware lasts longer and operates more quietly.
29. Open Bookcases or Display Niches
Open storage keeps frequently used items within easy reach. Cookbook collections, spice jars, and everyday dishes work well on open shelves. Vary shelf heights to accommodate different items.
Style these spaces carefully since everything stays visible. Group similar items together for organized appearances. Mix practical storage with decorative objects for visual interest.
Dust becomes an issue with open storage in kitchens. Plan for regular cleaning and avoid storing items you rarely use. Reserve open shelves for things you grab daily or weekly.
30. Cubbies and Shelf Compartments
Divided storage keeps items organized and easy to find. Wine storage cubbies hold bottles securely on their sides. Square compartments work well for dishes, bowls, and serving pieces.
Size compartments for specific items when possible. Dinner plates need different spacing than cereal bowls. Measure your dishes before building fixed dividers.
Adjustable shelves offer more flexibility over time. Your storage needs might change, and moveable shelves adapt easily. Standard shelf pin systems work in most applications.
31. Flip-Up and Hidden Appliance Panels
Appliance garages hide countertop clutter behind closed doors. Flip-up panels reveal coffee stations, toaster areas, or prep spaces. Everything stays plugged in and ready to use.
Tambour doors roll up and disappear completely. They don’t stick out into walkways like hinged doors. This matters more on islands where people move around all sides.
Plan counter depth carefully for appliance storage. Items need enough space to operate safely without hitting the door or surrounding cabinets. Steam and heat from appliances require proper ventilation.
Power strips inside appliance garages eliminate cord tangles. Plan for enough outlets to handle multiple appliances. GFCI protection is required for kitchen electrical installations.
Reflective, Metallic & Creative Concepts
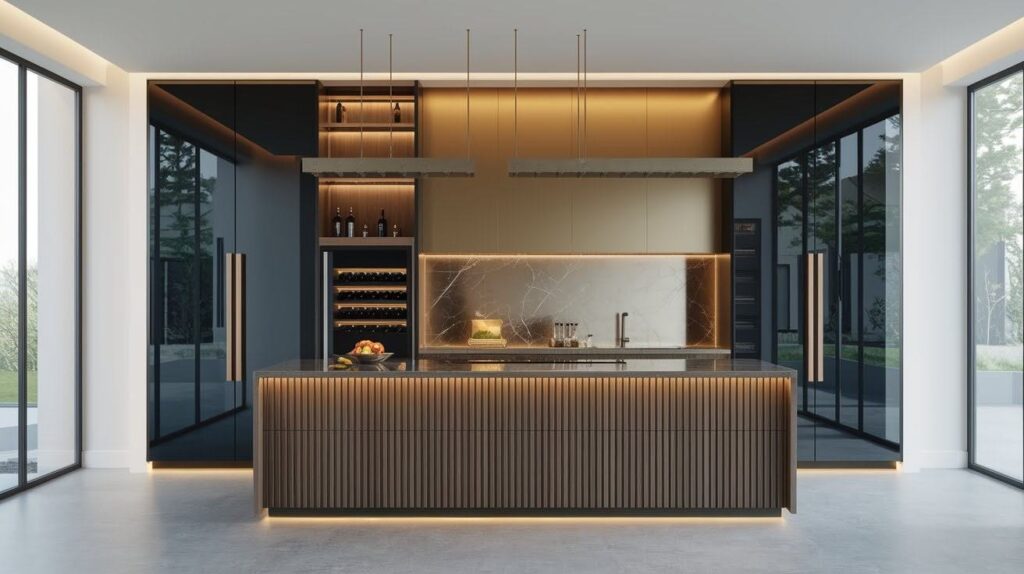
Add shine, smarts, and sophistication to your island with reflective finishes, metallic accents, and functional panel upgrades like wine fridges and hidden stool storage.
32. Reflective and Metallic Surfaces
Shiny surfaces bounce light around your kitchen and create the illusion of more space. These materials work especially well in smaller kitchens or areas with limited natural light. Each option brings different levels of drama and maintenance requirements.
33. Mirrored Panels for Light and Space
Mirrors make any kitchen feel bigger and brighter. They reflect natural light from windows and bounce artificial light throughout the room. Antique mirrors add character while standard mirrors keep things clean and modern.
Consider safety when choosing mirror types. Tempered glass resists breaking better than regular mirrors. Acrylic mirror sheets offer lighter weight and safer installation, though they scratch more easily.
34. High-Gloss Acrylic Finishes
Glossy surfaces create sleek, contemporary looks. Acrylic panels come in countless colors and resist moisture better than painted surfaces. They wipe clean easily and maintain their shine over time.
High-gloss finishes reflect everything around them, including imperfections. Wall preparation becomes critical since every bump and dent will show. Professional installation often makes sense for flawless results.
35. Metallic Accents: Gold, Silver, Brass
Metal panels add luxury and warmth to kitchen islands. Brass brings golden tones that complement wood and warm colors. Stainless steel matches commercial appliances and feels crisp and clean.
Real metal costs more but ages beautifully over time. Brass develops patina naturally. Stainless steel might show scratches but maintains its appearance with proper care.
Metallic finishes on other materials offer similar looks at lower costs. Painted metal finishes and metallic laminates provide the appearance without the price tag.
36. Wood and Metal Mixed-Panel Combos
Combining materials creates rich, layered appearances. Wood brings warmth while metal adds modern edge. Popular combinations include walnut with brass strips or oak with steel accents.
Plan the proportions carefully between materials. Too much metal overwhelms the wood’s natural beauty. Too little metal gets lost and looks like an afterthought.
Installation requires different techniques for each material. Wood expands and contracts with humidity changes. Metal stays stable but may need different fastening methods.
37. Functional & Creative Concepts
Think beyond standard panels to solve real kitchen problems. These creative approaches combine form with function to make your island work harder. Each idea addresses specific lifestyle needs while maintaining good looks.
38. Built-In Wine Fridge
Wine storage keeps bottles at perfect temperatures while creating a sophisticated focal point. Built-in wine fridges fit seamlessly into island backs without taking up valuable counter space. Choose units sized for your actual wine consumption habits.
Temperature zones matter if you drink both red and white wines. Dual-zone fridges store different types at their ideal temperatures. Single-zone units work fine if you prefer one wine type or don’t mind slight temperature compromises.
39. Hidden Stool Storage or Indented Panels
Bar stools clutter kitchens when not in use. Built-in storage keeps seating accessible but out of the way. Recessed panels create perfect stool parking spots that look intentional rather than makeshift.
Size recesses to match your specific stools. Measure seat width, leg spread, and overall height before cutting openings. Stools should slide in easily but not rattle around loosely.
Tips for Kitchen Island Back Panel Success
Planning and Design
- Measure your specific items before designing storage spaces
- Consider your kitchen’s overall style when selecting materials
- Plan electrical outlets during the design phase, not after installation
- Test material combinations with actual samples in your lighting conditions
- Calculate chair dimensions carefully if planning seating areas
Material Selection
- Choose wood tones that complement your countertops and existing cabinets
- Balance bold patterns with simpler materials to avoid overwhelming small spaces
- Consider long-term maintenance requirements when mixing different materials
- Select finishes that hide daily wear and fingerprints in active kitchens
- Use the 70-30 rule let one material dominate while others provide accents
Installation Considerations
- Plan for proper wall support when using heavy materials like stone
- Account for wood expansion and contraction with humidity changes
- Ensure adequate ventilation for built-in appliances and wine storage
- Use quality hardware like soft-close hinges to prevent slamming
- Consider professional installation for complex materials or precise work
Conclusion
Your kitchen island back panel offers endless possibilities to transform your space. From warm wood textures to sleek modern finishes, these 39 ideas prove that no style gets left behind. Whether you prefer built-in storage solutions or simple painted surfaces, the right choice balances your practical needs with personal taste.
The best back panel design works with your lifestyle, not against it. Busy families might prioritize hidden storage and easy-clean surfaces. Design lovers might choose statement materials that spark conversations. Either approach can succeed when you plan thoughtfully.
Your island back panel might seem like a small detail, but it shapes how your entire kitchen feels. Take time to consider your options. The right choice will serve your family well for years while expressing your unique style every single day.
Frequently Asked Questions
What’s the best material for a kitchen island back panel?
The best material depends on your lifestyle and kitchen style. Wood brings warmth and works in most designs, while tile offers easy cleaning and durability. Consider your maintenance preferences and how the material will look with your existing cabinets.
How much does it cost to install an island back panel?
Costs range from $200 for simple painted panels to $2,000+ for custom stone or built-in storage. DIY paint projects stay budget-friendly while professional installation of heavy materials like marble increases expenses. Get quotes for your specific design before starting.
Can I add storage to my existing island back panel?
Yes, many storage solutions work as retrofits to existing panels. You can add shelves, hooks, or even cut openings for built-in features. However, structural changes may require professional help to ensure safety and proper support.
How do I choose the right height for my island back panel?
Standard counter height works for most designs, but consider your specific needs. If you plan seating, account for chair backs and leg clearance. Storage panels might extend higher to maximize space, while decorative panels can stay at counter level.
What’s the easiest back panel option for beginners?
Paint offers the simplest starting point for DIY projects. Clean your existing surface, prime if needed, and apply quality paint in your chosen color. This approach requires minimal tools and skills while delivering immediate visual impact.