
I love converting ordinary boxes into something special. You probably have empty boxes lying around your house right now. Instead of throwing them away, why not turn them into beautiful storage containers or gift boxes?
Painting boxes is one of my favorite weekend activities. It’s cheap, fun, and anyone can do it. You don’t need fancy art skills or expensive supplies.
In this guide, I’ll show you simple painting techniques that work every time. We’ll cover everything from color blocking to nature designs. These projects are perfect for beginners and kids, too.
Ready to make something amazing? Let’s start painting!
Why Paint Boxes?
Save money and help the planet. Instead of buying new storage containers, you can reuse boxes you already have. This keeps them out of the trash and saves you cash.
Make boring storage look good. Plain cardboard boxes are ugly. A coat of paint transforms them into decorative pieces you’ll want to display.
Create custom gift packaging. Store-bought gift boxes cost a lot. Painted boxes make your presents look thoughtful and unique.
Enjoy quality time with family. Kids love painting projects. It’s a great way to spend time together on weekends or school breaks.
Supplies You’ll Need
You don’t need much to get started. Here’s my basic supply list:
Boxes:
- Cardboard shoe boxes
- Wooden crates or gift boxes
- Cereal boxes
- Any clean packaging boxes
Paint and tools:
- Acrylic paint
- Spray paint
- Paintbrushes in different sizes
- Painter’s tape for clean lines
- Stencils for patterns
Most of these items cost under $20 total. You probably have some already.
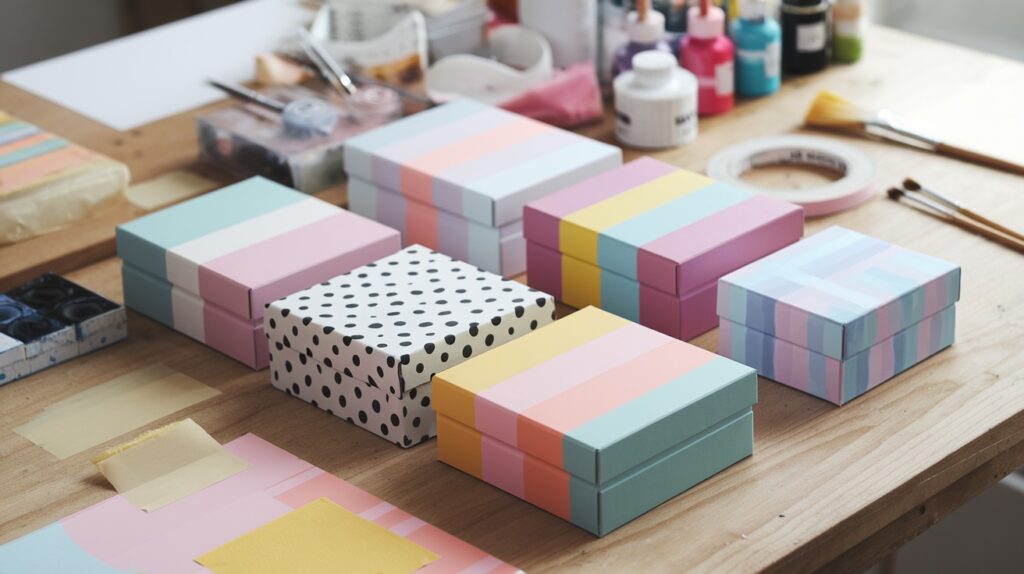
Easy Box Painting Ideas to Try
Turn ordinary cardboard and wooden boxes into beautiful storage containers and gift packaging with these simple painting techniques. Perfect for beginners, kids, and anyone looking for budget-friendly DIY projects that add color and organization to any space.
1. Pastel Color Blocking
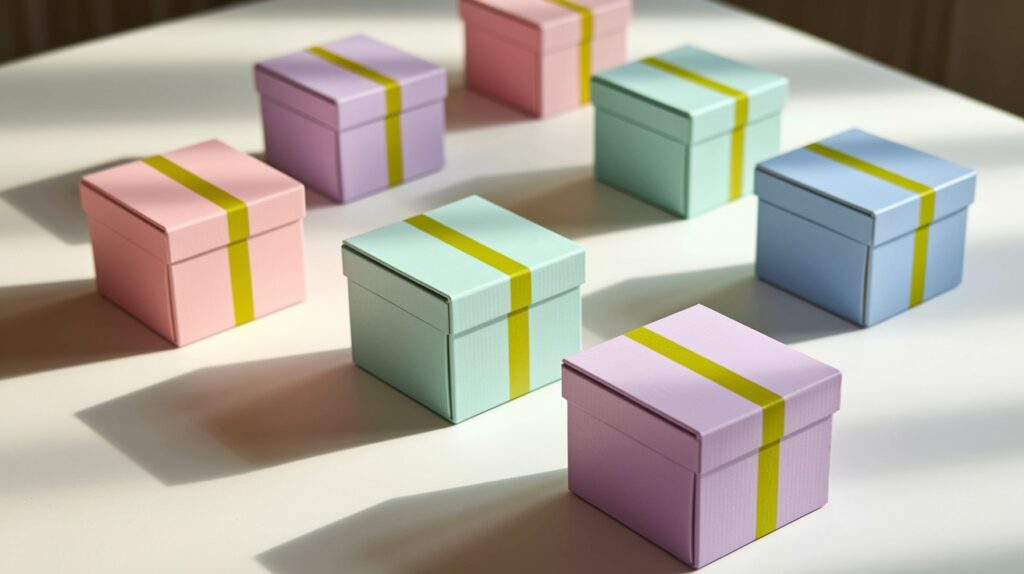
This technique creates clean, modern lines. I use it all the time for spring decorating.
Start by covering your box with painter’s tape. Create different sections – rectangles, squares, or diagonal lines work well. Press the tape edges down firmly.
Paint each section a different pastel color. Soft pink, mint green, and light yellow look beautiful together. Let the first coat dry completely before adding a second coat.
Remove the tape while the paint is still slightly wet. This prevents peeling.
These boxes are perfect for organizing craft supplies or wrapping baby gifts.
2. Polka Dot Fun
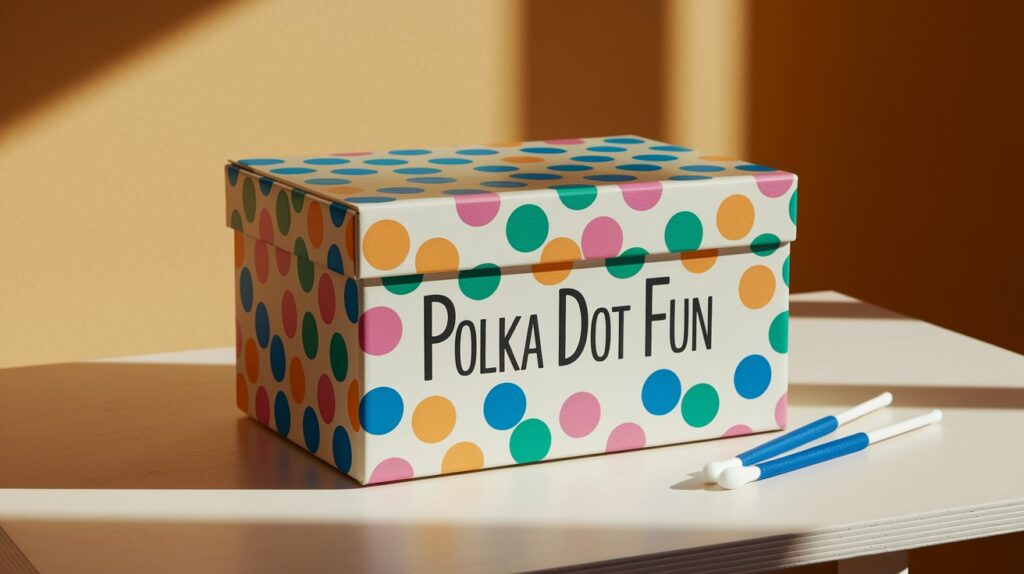
Kids love this design. It’s simple but looks so cheerful.
You’ll need cotton swabs or small sponges for making dots. Dip them in paint and press gently onto your box. Space the dots evenly for a classic look, or cluster them for a more playful style.
Try bright colors on white boxes. Orange dots on yellow. Blue dots on green. The contrast makes the dots pop.
This pattern works great for toy storage boxes or party decorations.
3. Ombre Fade
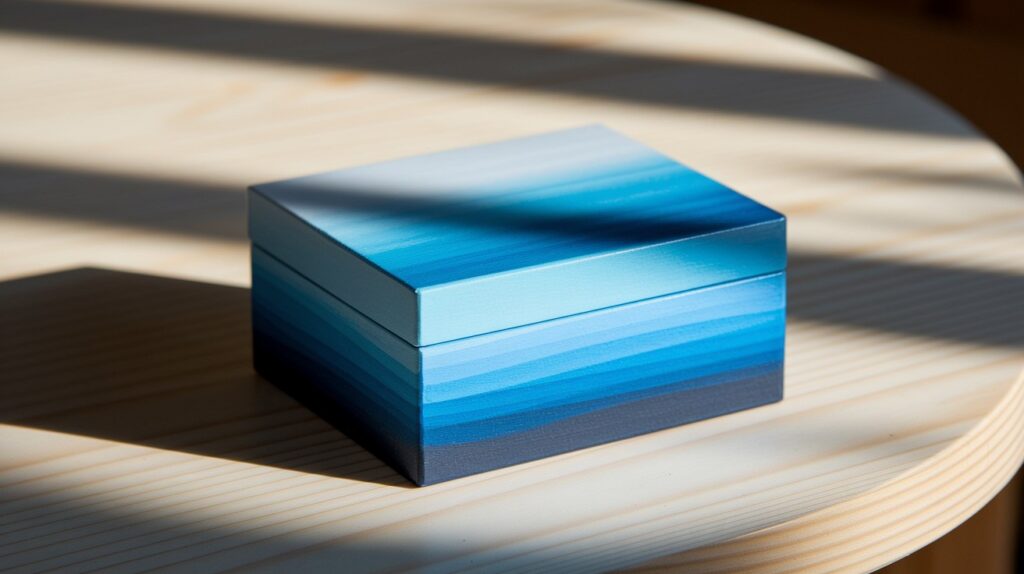
This modern technique looks fancy, but it’s easy to master.
Choose three shades of the same color. Light blue, medium blue, and dark blue work perfectly. Start with the lightest shade at the top of your box.
While the paint is still wet, blend in the medium shade about halfway down. Add the darkest color at the bottom. Use a clean, damp brush to blend where the colors meet.
Work quickly before the paint dries. The result is a smooth gradient that looks professional.
4. Stencil Patterns
Stencils give you perfect designs every time. No artistic skills required.
Place your stencil on the box and secure it with tape. Use a sponge to dab paint through the openings. Don’t brush – this can make paint bleed under the stencil.
Lift the stencil carefully while the paint is wet. Clean geometric patterns work well for office storage. Floral designs are pretty for bedroom boxes.
You can buy stencils or make your own from cardboard.
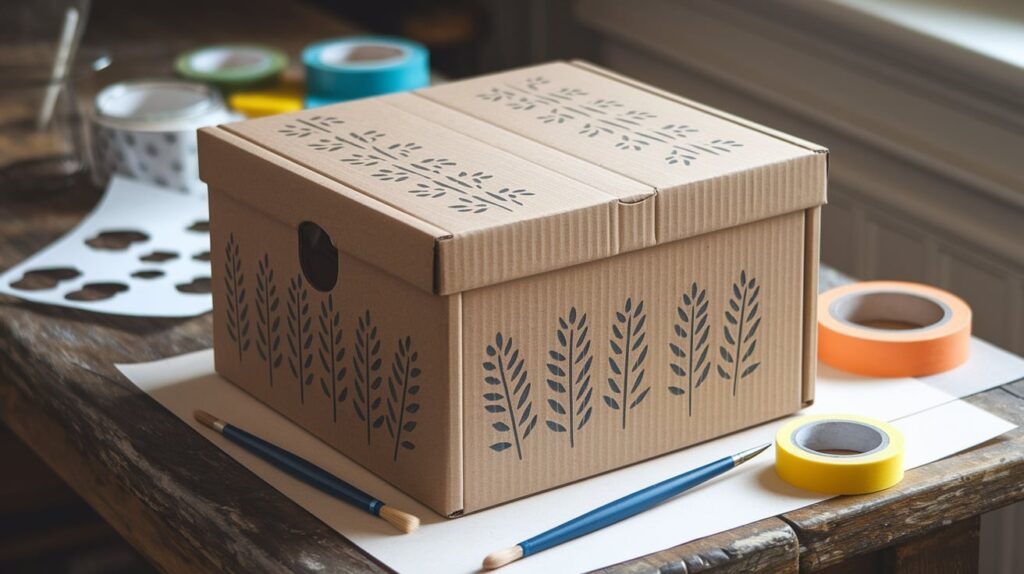
5. Nature-Inspired Motifs
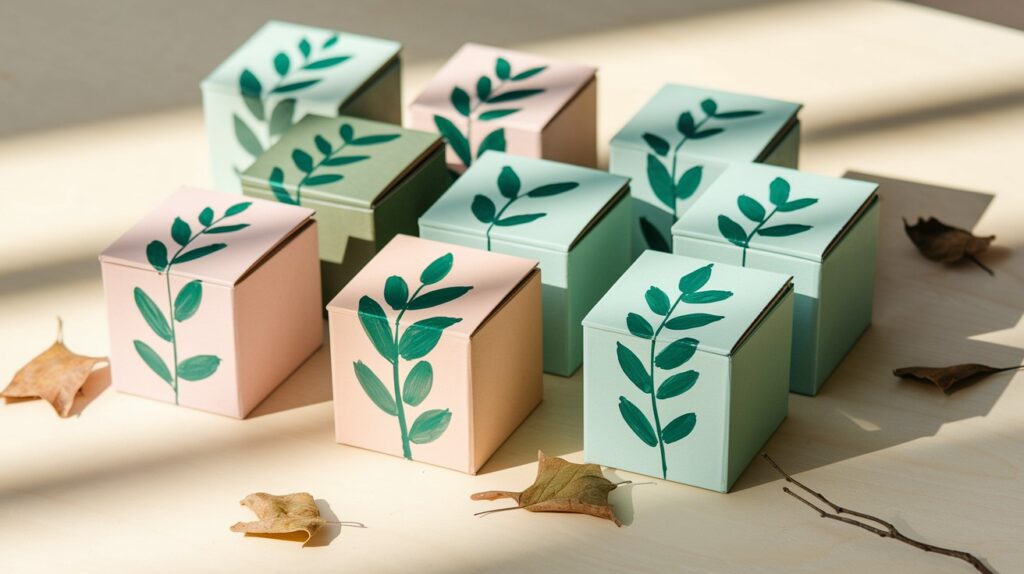
Simple nature designs add a calm, organic feel to any room.
Paint basic leaf shapes with a small brush. Start with simple ovals in different shades of green. Add a line down the middle for the vein.
For flowers, paint circles in bright colors and add simple petals around them. Vines are just wavy lines with small leaves attached.
These boxes look great in kitchens, bathrooms, or anywhere you want a natural touch.
6. Chalkboard Paint Box
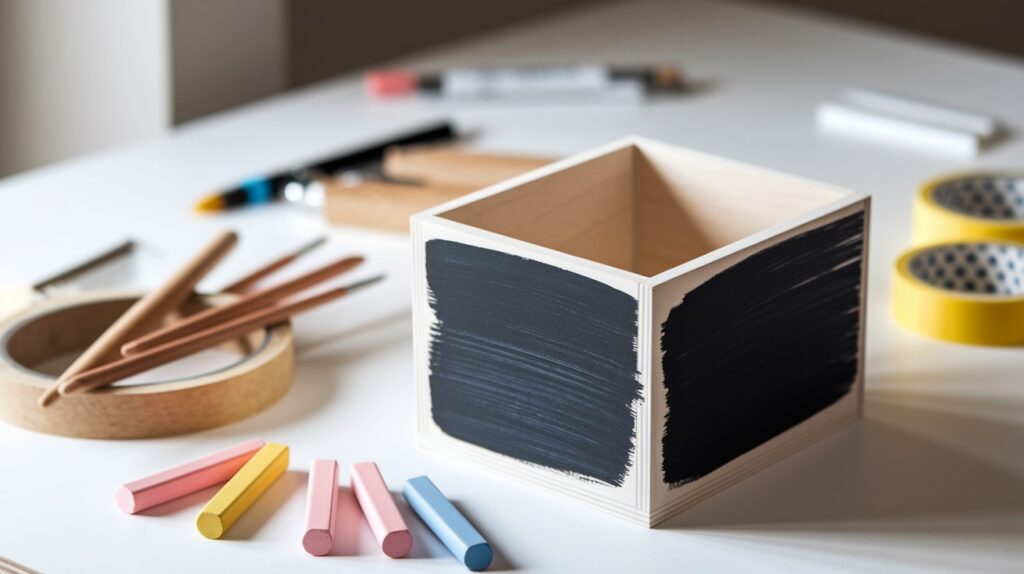
This is my favorite functional design. You can change the labels anytime you want.
Paint one side of your box with chalkboard paint. Follow the directions on the can – usually, two coats work best. Let it cure for the recommended time.
Once dry, rub chalk all over the surface and erase it. This season, the chalkboard erases cleanly later.
Now you can write on it with chalk and change the labels whenever you reorganize.
Perfect for pantry storage, craft supplies, or kids’ rooms.
7. Metallic Accents
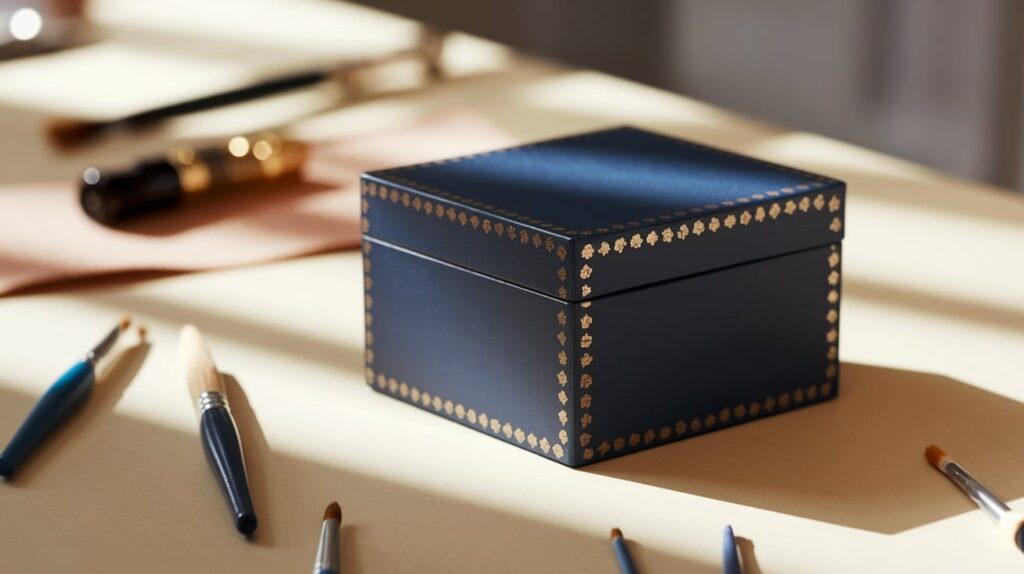
A little metallic paint makes any box look expensive. Paint your box in a solid base color first. Let it dry completely. Then add metallic touches with a small brush.
Try gold corners on a white box. Silver stripes on navy blue. Copper dots on sage green.
The key is using metallic paint sparingly. Too much looks overwhelming.
These boxes are beautiful for gifts or bedroom storage.
Pro Tips for Better Results
- Always prime wooden boxes first. Wood soaks up paint unevenly without primer. One coat of white primer makes your colors look brighter and more even.
- Let each coat dry completely. I know it’s tempting to rush, but wet paint over wet paint creates a mess. Check the paint can for drying times.
- Use thin coats instead of thick ones. Two thin coats look better than one thick coat. Thick paint drips and looks lumpy.
- Seal boxes that get heavy use. A clear topcoat protects your paint job. Spray sealers are easiest to apply evenly.
- Mix textures for interest. Try combining smooth paint with textured elements like rope or fabric strips.
Best Box Types for Painting
Not all boxes paint the same way. Here’s what works best:
- Shoe boxes are perfect for beginners. The cardboard takes paint well.
- Wooden crates look the most professional when painted. They’re sturdy for years.
- Cereal boxes are fun to modify. Cut them down or reshape them into new forms.
- Amazon boxes work great if they’re not too waxy. Remove all tape and stickers first.
- Avoid boxes with glossy coatings – paint won’t stick well to them.
Conclusion
Box painting is one of the easiest ways to add color and organization to your home. You don’t need special skills or expensive supplies. Most projects take less than an hour of actual work time.
I encourage you to try one of these ideas this weekend. Start simple with solid colors or polka dots. Once you get comfortable with the basics, try more advanced techniques.
Remember, there are no mistakes in crafting – only happy accidents that become new ideas. Your painted boxes don’t have to be perfect to be beautiful and useful.
Small DIY projects like this one can completely change how your space looks and feels. Plus, you’ll have the satisfaction of creating something useful with your own hands.
Frequently Asked Questions
What paint works best on cardboard boxes?
Acrylic paint is ideal, it’s quick-drying, colorful, and works well on cardboard. It also provides good coverage without soaking through the material. You can find acrylic paints in any craft store, and they come in hundreds of colors to match your project needs.
How do I prevent paint from soaking into cardboard?
Apply a light coat of primer or Mod Podge before painting. This creates a barrier that helps the paint stay on the surface instead of absorbing into the cardboard. The primer also makes your final paint colors look brighter and more vibrant.
Can I paint over printed logos on a box?
Yes, just use primer or a base coat first to block the print. Without primer, the logos might show through your paint, especially with lighter colors. A good base coat ensures your final design looks clean and professional.
Are these ideas safe for kids to try?
Totally! Just supervise and use non-toxic paints for younger kids. Make sure to cover work surfaces with newspaper or plastic to protect your table. It’s also a good idea to have kids wear old clothes or aprons since paint can be messy.
How can I make my painted boxes last longer?
Seal with a clear spray or Mod Podge to protect the paint. This topcoat prevents scratches and makes the boxes easier to clean with a damp cloth. The sealant is especially important for boxes that will be handled frequently or stored in humid areas.