
Looking for driveway apron ideas that actually work? You’re in the right place.
Your home’s entrance makes the first impression. But most homeowners ignore the driveway apron completely. This is a mistake. From basic concrete to premium stone, I’ve seen what works and what doesn’t.
This guide solves your apron problems. You’ll find 15 proven designs that boost curb appeal and property value. I’ll show you exact costs, best materials, and maintenance secrets. No sales pitch here. Just honest advice from someone who’s done this hundreds of times. You’ll learn which materials last longest in your climate and which designs fit your budget.
Here’s what’s inside: material comparisons, cost breakdowns, DIY steps, and maintenance tips that prevent expensive repairs. Ready to change your entrance? Let’s start.
What Is a Driveway Apron? (And Why It Matters)
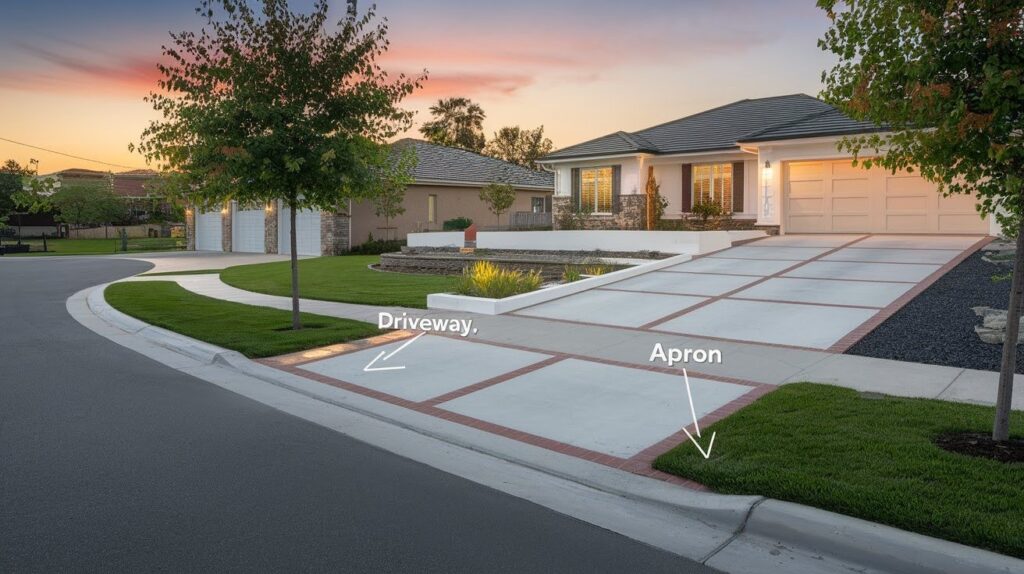
A driveway apron is the paved area where your driveway meets the public street or sidewalk. Think of it as your home’s handshake with the neighborhood. Most aprons are 10 to 20 feet wide. The exact size depends on your local building codes and driveway width.
Why does this small area matter so much?
- Legal requirement: Most cities require proper aprons for drainage and safety
- Property value boost: A well-designed apron can increase home value by 3-5%
- Prevents damage: Protects your main driveway from street runoff
- Safety first: Creates a smooth transition for vehicles and pedestrians
Here’s the thing. Many homeowners treat aprons as an afterthought. They use basic concrete and call it done. This is a mistake. Your apron gets seen by everyone who passes your home. It’s worth the extra thought.
How to Choose the Right Driveway Apron Design
Picking the perfect apron design isn’t just about looks. You need to balance style, function, and budget. Start with your home’s architecture. A modern house needs a different approach than a Victorian cottage.
Consider these key factors:
- Climate conditions – Freeze-thaw cycles affect material choice
- Traffic volume – Busy streets need more durable materials
- Drainage needs – Proper slope prevents water damage
- Maintenance level – Some materials need more upkeep than others
- Local regulations – Cities often have specific requirements
Budget reality check: Aprons typically cost $8-25 per square foot installed. Premium materials can push that to $40+ per square foot. But here’s what I tell all my clients. A quality apron lasts 20-30 years with proper maintenance. That breaks down to just dollars per year.
Top 15 Driveway Apron Ideas to Improve Your Entrance
Let me share the most effective designs I’ve installed over the years. Each one creates a different mood and serves specific needs.
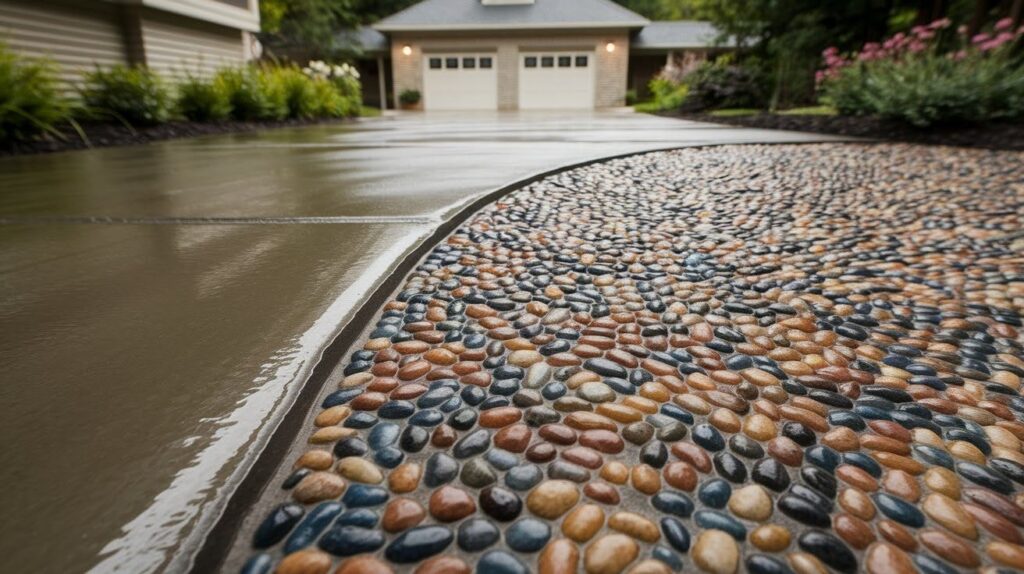
a. Classic Cobblestone Charm

Natural cobblestone never goes out of style. Real cobblestone costs $15-25 per square foot. The irregular shapes create beautiful patterns that age gracefully.
Installation tip: Use a sand base for proper drainage. Set stones close together to prevent weed growth.
Best for: Historic homes, traditional neighborhoods, high-end properties.
Maintenance: Sweep regularly and re-sand joints every 2-3 years.
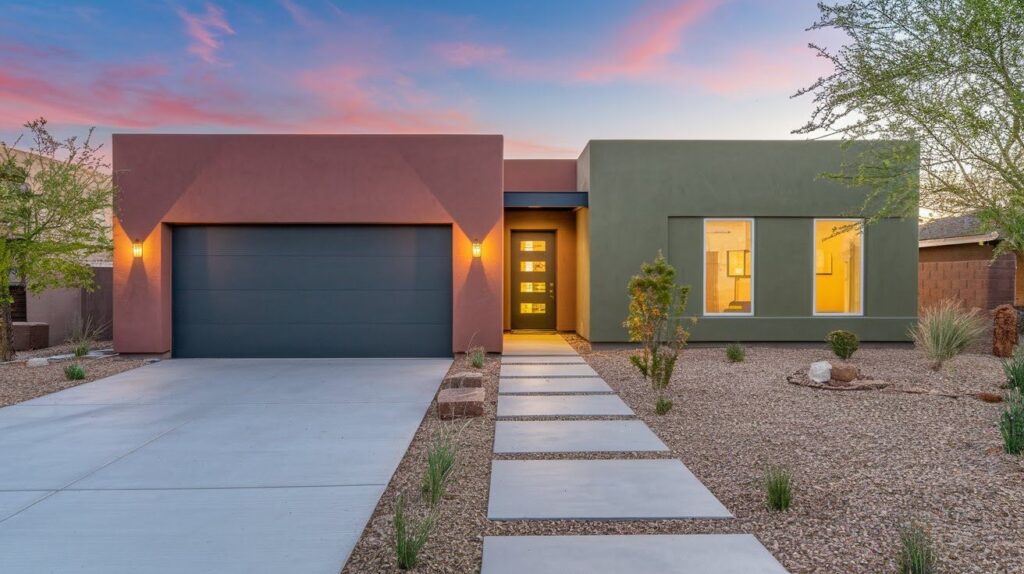
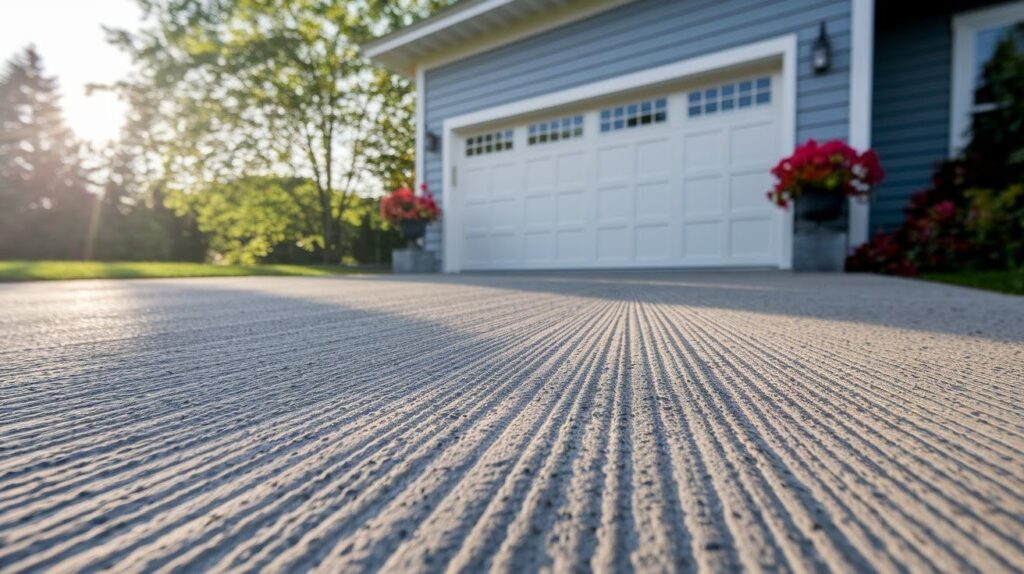
b. Modern Concrete Borders
Clean lines define modern design. Standard concrete gets a makeover with decorative borders. Add contrasting colors or textures along the edges.
Cost-effective option: Basic concrete runs $8-12 per square foot. Decorative borders add $3-5 per linear foot. The key is proportion. Make borders 12-18 inches wide for visual impact.
Pro tip: Use control joints every 8 feet to prevent random cracking.
c. Brick Herringbone Patterns

Timeless pattern with serious durability. Herringbone brick creates movement and interest. The interlocking pattern handles vehicle weight better than running bonds.
Material cost: Clay bricks run $12-18 per square foot installed.
Color options:
- Red brick: Classic and versatile
- Charcoal brick: Modern and refined
- Buff brick: Warm and welcoming
Installation requires a concrete base in cold climates. Sand base works in milder areas.
d. Stamped Concrete Illusions
Get the look of premium materials at concrete prices. Stamped concrete mimics stone, brick, or tile patterns. Modern techniques create incredibly realistic textures.
Popular patterns for aprons:
- Ashlar slate
- European cobblestone
- Large format tile
- Natural stone
Cost range: $12-18 per square foot including color and sealer. The secret is in the details. Quality contractors use multiple colors and hand-touch textures.
e. Gravel Aprons with Stone Edging
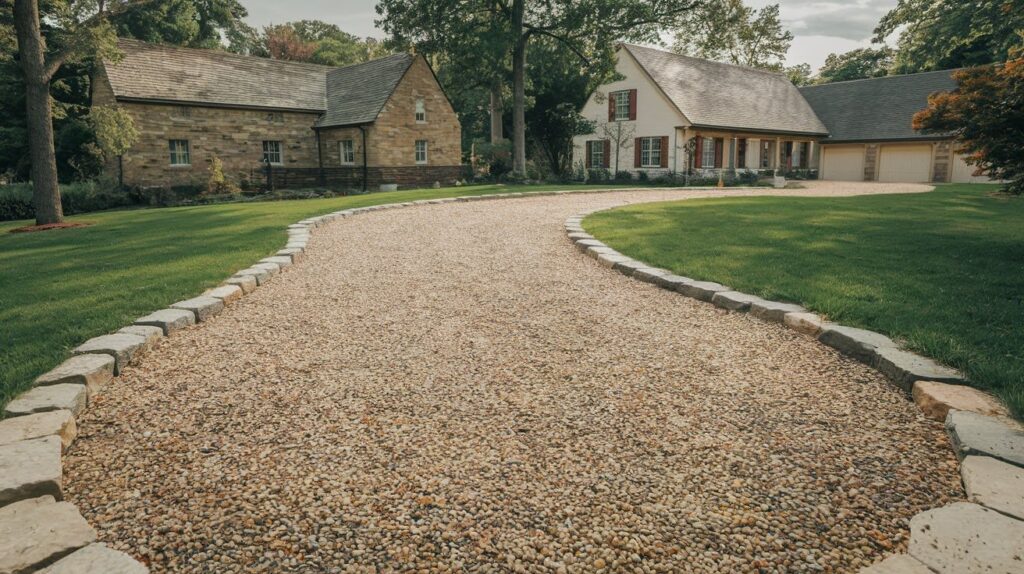
Budget-friendly with rustic appeal. Gravel aprons work well for country homes and casual designs. But you need proper edging to contain the material.
Edging options:
- Natural fieldstone
- Concrete curbing
- Steel edging (hidden)
- Pressure-treated lumber
Gravel costs: $2-5 per square foot installed.
Maintenance reality: You’ll need to rake and add fresh gravel annually.
f. Permeable Paver Designs
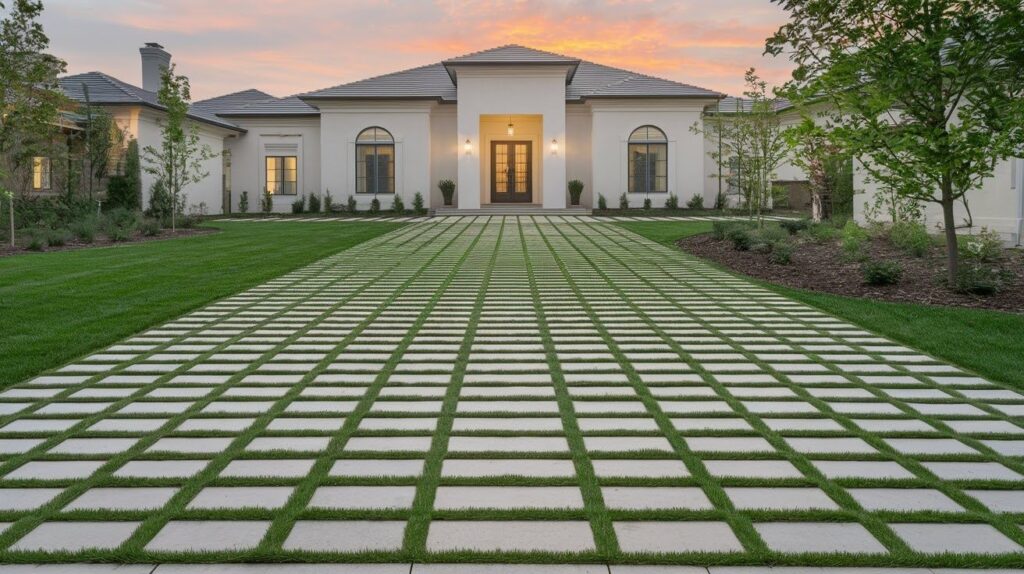
Eco-friendly and legally smart. Many cities now require permeable surfaces for water management. Permeable pavers let rainwater soak through instead of running off.
Popular permeable options:
- Grass pavers with living joints
- Porous concrete pavers
- Recycled plastic grid systems
- Natural stone with wide joints
Cost: $15-25 per square foot installed.
Extra benefit: May qualify for city rebates or reduced stormwater fees.
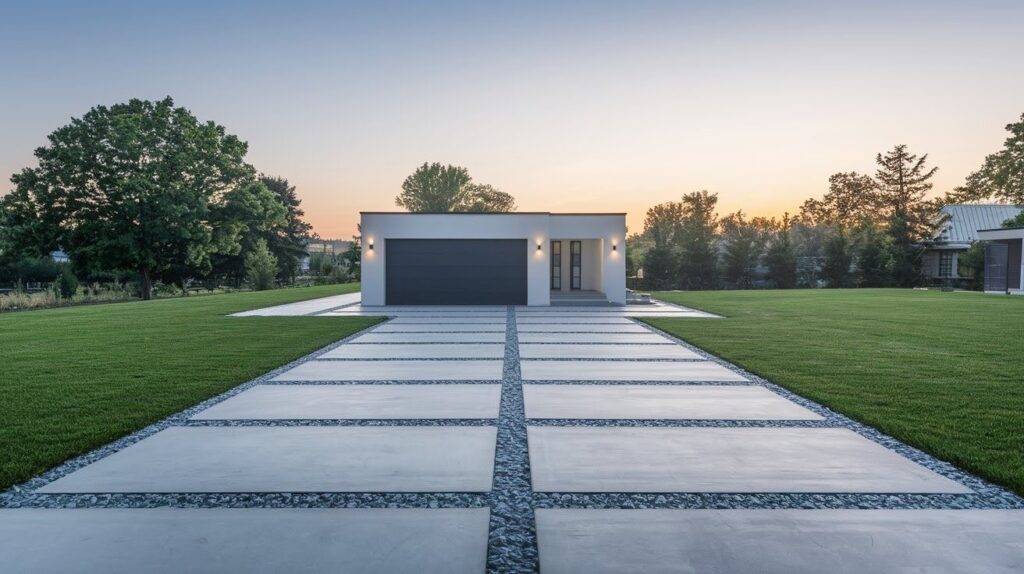
g. Mixed Material Combinations

Create visual interest with material contrast. Some of my favorite designs combine 2-3 materials. The contrast adds appeal.
Good combinations:
- Concrete strips with gravel panels
- Brick borders with stamped concrete centers
- Natural stone accent strips in concrete
- Decorative aggregate panels with solid borders
Design rule: Keep one material dominant (60-70% of the surface).
h. Decorative Aggregate Finishes
Exposed aggregate adds texture and grip. This technique exposes colorful stones on the concrete surface. It creates natural texture and improves traction.
Aggregate options:
- River rock (smooth and rounded)
- Crushed granite (angular and sparkly)
- Recycled glass (colorful and different)
- Local stone (matches regional character)
Cost: $10-15 per square foot for quality work.
Weather benefit: Textured surface provides better grip in wet conditions.
i. Interlocking Concrete Pavers
Modular system with many patterns. Concrete pavers offer more design flexibility than poured concrete. You can create complex patterns and easily replace damaged sections.
Popular paver patterns:
- Running bond (brick-like)
- Basketweave (classic squares)
- Circular patterns (curved designs)
- Random ashlar (natural stone look)
Size options: From 4×8 inch rectangles to 24×24 inch squares.
Installation advantage: No curing time needed. Ready to use immediately.
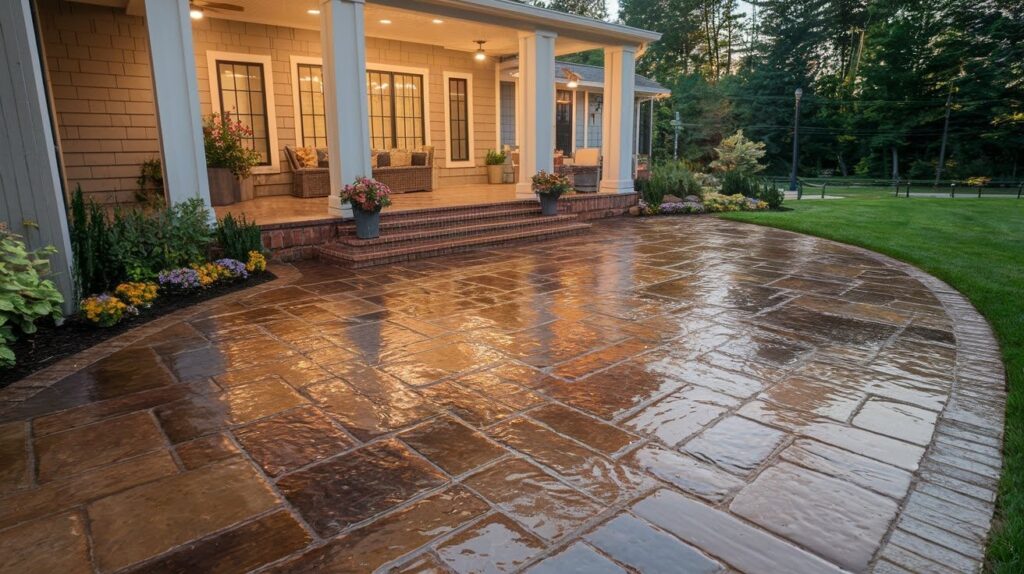
j. Natural Flagstone Beauty
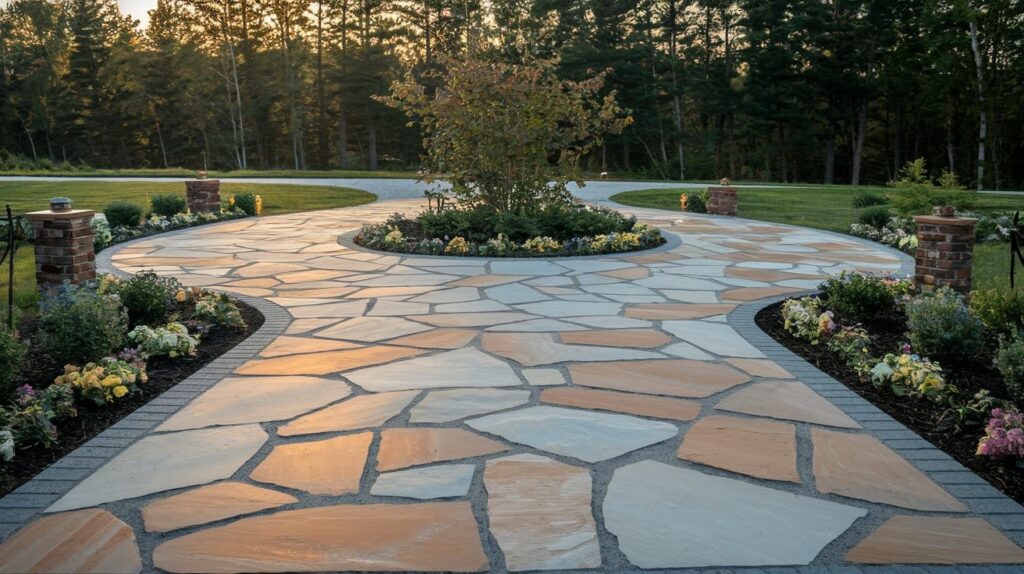
Irregular beauty that feels organic. Flagstone creates the most natural-looking aprons. Each piece is different in size and color.
Popular flagstone types:
- Pennsylvania bluestone (classic gray-blue)
- Arizona sandstone (warm earth tones)
- Tennessee limestone (consistent cream color)
- Colorado red stone (dramatic rust colors)
Thickness matters: Use 2-inch thick stones for vehicle traffic.
Installation: Set in mortar for durability or sand for drainage.
k. Colored Concrete Statements
Colors change plain concrete into design statements. Integral color changes plain concrete into design statements. Modern color options go far beyond basic gray.
Popular colors:
- Charcoal gray (refined and modern)
- Terra cotta (warm southwestern feel)
- Sage green (natural and calming)
- Deep burgundy (rich and traditional)
Color tips: Darker colors hide stains better but show salt residue more.
Cost addition: Integral color adds $1-2 per square foot.
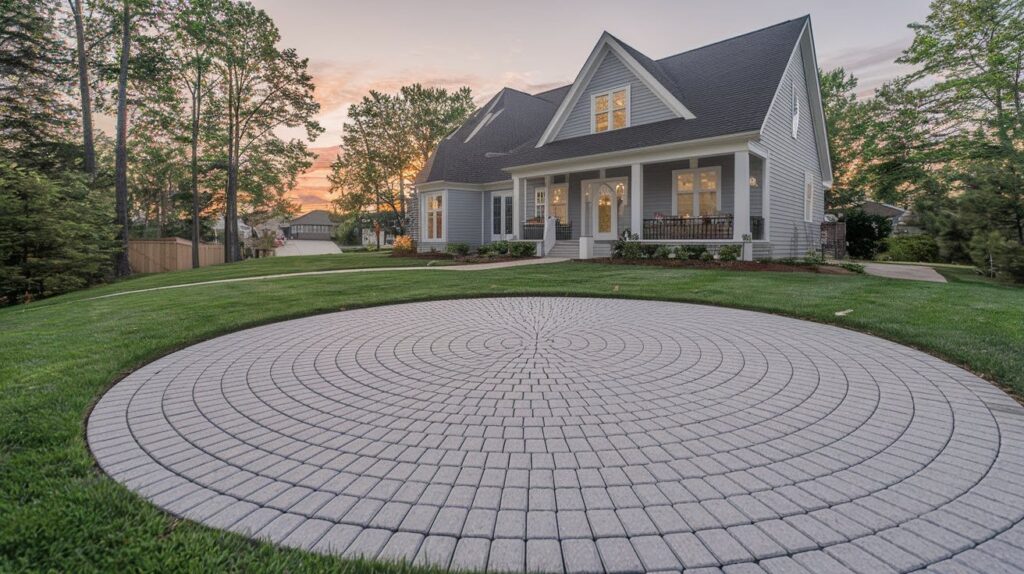
l. Geometric Pattern Designs
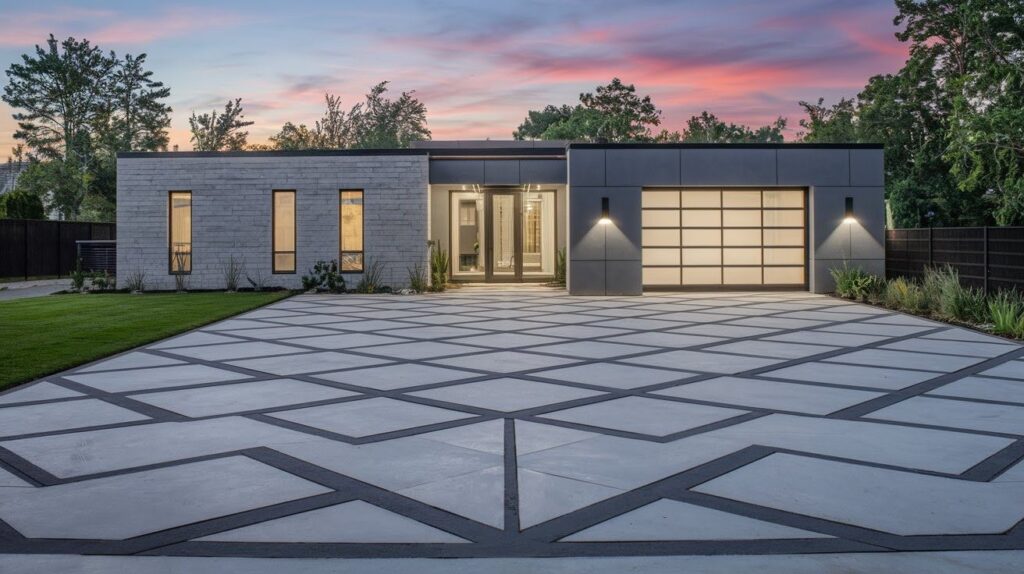
Mathematical precision meets artistic flair. Geometric patterns work especially well with modern and contemporary homes. Clean lines and repeated shapes create visual rhythm.
Popular geometric approaches:
- Hexagonal pavers
- Diamond patterns in contrasting colors
- Chevron concrete strips
- Circular medallion centers
Design software helps: Many contractors now use design programs to show you patterns before installation.
m. Grass Paver Systems
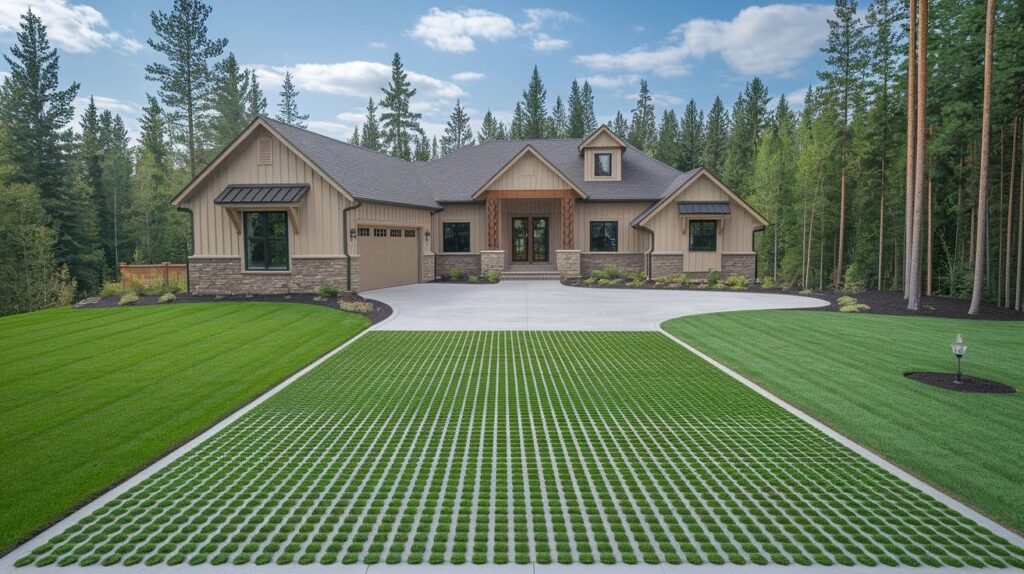
Green solutions for eco-conscious homeowners. Grass pavers support vehicle weight while maintaining a natural appearance. The grass grows through openings in the paver system.
System types:
- Plastic grid systems
- Concrete rings with soil centers
- Permeable concrete with large openings
Maintenance needs: Regular watering and occasional overseeding.
Climate consideration: Works best in moderate climates with adequate rainfall.
n. Border and Accent Combinations
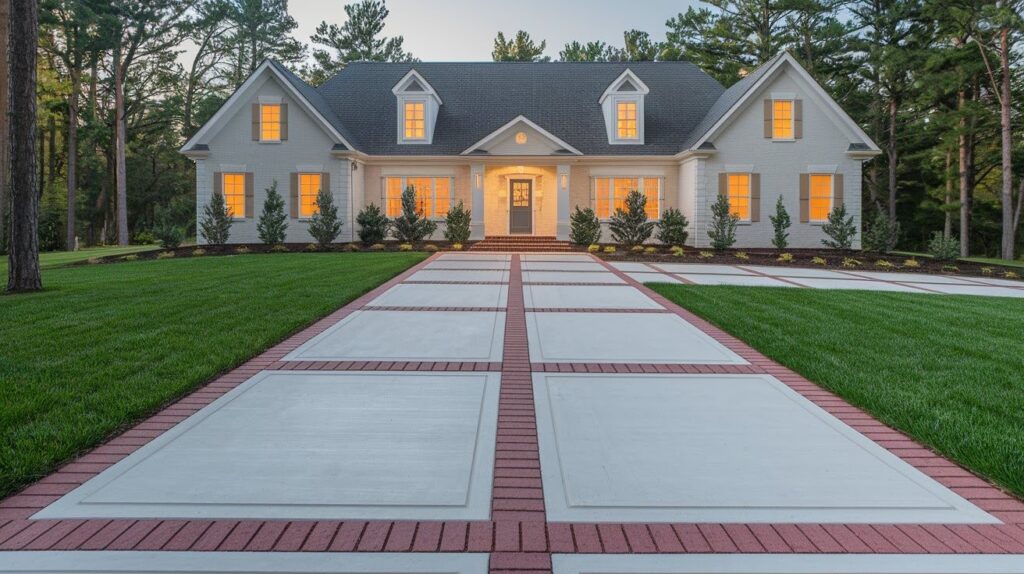
Frame your apron like artwork. Adding decorative borders changes simple aprons into custom designs. The border creates definition and adds premium appeal.
Good border ideas:
- Contrasting brick soldier course
- Natural stone edge strips
- Colored concrete bands
- Decorative metal strips
Proportion guide: Make borders 8-12 inches wide for standard driveways.
o. Textured Concrete Finishes
Surface treatments add character. Basic concrete becomes interesting with surface textures. These techniques add grip and visual appeal.
Texture options:
- Broom finish (parallel lines)
- Salt finish (subtle texture)
- Stamped patterns (deep texture)
- Troweled swirls (artistic curves)
Weather advantage: Textured surfaces provide better traction than smooth concrete.
Best Materials for a Long-Lasting Driveway Apron
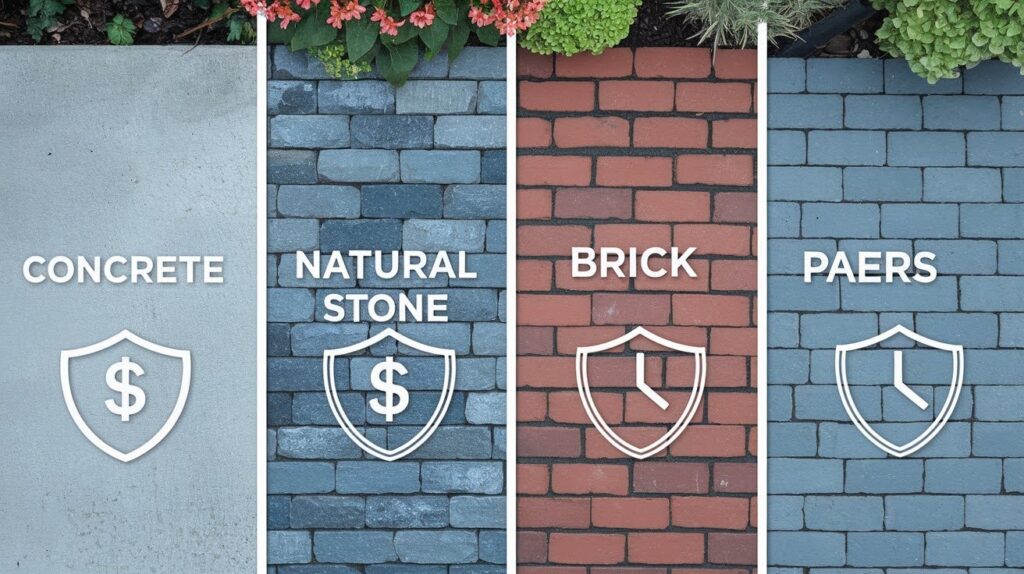
Material choice determines how your apron performs over decades. I’ve seen beautiful designs fail because of poor material selection. Climate is king. What works in Arizona won’t work in Minnesota.
Concrete: The Reliable Workhorse
Pros:
- Affordable ($8-12 per square foot)
- Durable in most climates
- Easy to maintain
- Can be decoratively finished
Cons:
- Cracks in freeze-thaw cycles
- Shows stains easily
- Limited design options when plain
Best for: Moderate climates, budget-conscious projects, modern designs.
Natural Stone: Premium Performance
Pros:
- Incredibly durable
- Beautiful appearance
- Increases property value significantly
- Improves with age
Cons:
- High cost ($20-40 per square foot)
- Requires skilled installation
- Some types stain easily
Best for: High-end homes, historic properties, areas with mild winters.
Clay Brick: Traditional Durability
Pros:
- Long-lasting (50+ years)
- Classic appearance
- Good traction when wet
- Repairs easily
Cons:
- Moderate cost ($12-18 per square foot)
- Can shift without proper base
- Limited color options
Best for: Traditional homes, areas with freeze-thaw cycles, brick house exteriors.
Interlocking Pavers: Modern Convenience
Pros:
- Easy repairs
- No cracking issues
- Lots of design options
- Good drainage
Cons:
- Higher cost than concrete
- Weeds can grow in joints
- Can shift over time
Best for: Areas with ground movement, homeowners who like design flexibility.
Cost Guide: What to Expect When Installing a Driveway Apron
Let me give you realistic numbers based on current market rates. Prices vary by region, but these ranges hold true across most of the country.
Basic Options ($8-15 per square foot)
- Plain concrete: $8-12 per square foot
- Basic stamped concrete: $10-15 per square foot
- Gravel with edging: $5-10 per square foot
- Standard concrete pavers: $12-15 per square foot
Mid-Range Options ($15-25 per square foot)
- Colored concrete: $12-18 per square foot
- Clay brick: $15-20 per square foot
- Premium pavers: $18-25 per square foot
- Basic natural stone: $15-25 per square foot
Premium Options ($25-40+ per square foot)
- Natural flagstone: $25-35 per square foot
- High-end pavers: $25-30 per square foot
- Cobblestone: $30-40 per square foot
- Custom stone work: $35-50+ per square foot
Size Matters for Total Cost
Typical apron sizes:
- Small (200 sq ft): $1,600-8,000 total
- Medium (400 sq ft): $3,200-16,000 total
- Large (600 sq ft): $4,800-24,000+ total
Hidden costs to budget for:
- Permits: $50-200
- Excavation: $3-5 per square foot
- Base preparation: $2-4 per square foot
- Drainage work: $500-2,000
Money-saving tip: Get quotes in late fall or winter when contractors have lighter schedules.
DIY Driveway Apron Installation: Step-by-Step Guide
I always recommend professional installation for aprons. But some simple designs work as DIY projects if you have the right skills.
Before you start: Check local building codes. Many areas require permits and inspections for apron work.
What You Can DIY
Good DIY options:
- Gravel aprons with simple edging
- Basic concrete pads (if you have concrete experience)
- Paver installations on stable ground
- Decorative overlays on existing concrete
Leave to professionals:
- Drainage modifications
- Work near utilities
- Complex grading
- Structural repairs
Basic DIY Steps for Gravel Apron
Tools needed:
- Excavation tools
- Plate compactor rental
- Level and stakes
- Wheelbarrow
Materials:
- Base gravel
- Finish gravel
- Edging material
- Landscape fabric
Step 1: Mark the area and call 811 for utility marking.
Step 2: Excavate 6-8 inches deep with proper slope for drainage.
Step 3: Install edging along perimeter.
Step 4: Add and compact 4 inches of base gravel.
Step 5: Install landscape fabric.
Step 6: Add 2-3 inches of finish gravel and level.
Reality check: This project takes most homeowners 2-3 weekends to complete properly.
When to Call Professionals
Red flags that mean hire a pro include existing drainage problems, utilities in the work area, steep slopes or complex grading, local codes that require permits, and complex designs that need special skills.
Professional benefits include proper permits and inspections, warranty on workmanship, access to the right tools and equipment, and knowledge of local building codes that can save you costly mistakes.
Driveway Apron Maintenance & Longevity Tips
A well-maintained apron lasts decades. Poor maintenance ruins even premium materials in just a few years.
I see the same mistakes over and over. Here’s how to avoid them:
- Clean oil stains immediately with cat litter and pressure wash tire marks before they set permanently
- Seal cracks before winter to prevent freeze-thaw damage that leads to expensive repairs
- Maintain proper drainage by cleaning channels regularly and redirecting downspouts away from your apron
- Use sand instead of salt for winter traction to avoid damaging concrete and natural stone surfaces
- Schedule annual deep cleaning and re-sand paver joints to maintain appearance and prevent weed growth
Conclusion
Your driveway apron makes the first impression. Choose wisely and it adds thousands to your home value. Choose poorly and you’ll regret it for decades.
I’ve shown you 15 proven designs that work. From budget-friendly gravel to premium stone, each option serves different needs and budgets. The secret is matching your choice to your situation. Consider your climate, traffic, and maintenance preferences. Don’t just pick what looks pretty online.
Quality installation matters more than expensive materials. A skilled contractor using basic concrete beats poor work with premium stone every time. Start with these simple steps. Measure your space first. Research local building codes. Get three quotes from licensed contractors.
Your entrance makeover begins now. Pick the design that fits your style and budget. Invest in proper installation. Maintain it regularly. The results will surprise you. Neighbors will notice. Visitors will comment. Your property value will thank you.
Frequently Asked Questions
How long does a driveway apron typically last?
Most driveway aprons last 20-30 years with proper maintenance. Premium materials like natural stone or quality brick can last 50+ years when installed correctly.
Do I need a permit to install a driveway apron?
Most cities require permits for driveway apron installation since it connects to public streets. Check with your local building department before starting any work.
What’s the difference between an apron and a regular driveway?
A driveway apron is the specific section that connects your private driveway to the public street or sidewalk. It’s typically 10-20 feet wide and must meet city specifications for materials and drainage.
Can I install a driveway apron myself?
Simple designs like gravel aprons can be DIY projects for experienced homeowners. However, most aprons require professional installation due to drainage requirements and local building codes.
How much does it cost to replace an existing driveway apron?
Replacement costs range from $1,600-8,000 for typical residential aprons depending on size and materials. Premium materials and complex designs can push costs to $15,000 or more.