
Gardening has always been more than just a hobby for me—it’s a true passion. But as the seasons changed, I realized that keeping my plants thriving year-round wasn’t possible without a greenhouse. That’s when the idea of building a DIY pallet greenhouse took root.
Instead of spending thousands on a pre-made structure, I Chose to create an affordable, eco-friendly alternative tailored to my backyard. With just a set of pallets, some creativity, and determination, I built a fully functional greenhouse that now shelters my plants in every season.
The process was a mix of challenges and rewarding moments, and I learned so much along the way. Today, I’m excited to share every detail so you can build your own DIY pallet greenhouse with confidence!
Materials and Tools Needed
Materials
- 8-10 heat-treated wooden pallets stamped “HT” to prevent pest and fungal infestations
- Plastic sheeting of 6-mil thickness, waterproof, durable and insulating for the covering material
- Beams for roofing support
- Screws, nails, and brackets to assemble it together
- Door hinges
- Weed barrier fabric
- Concrete blocks
- Paint or stain (if it’s meant for aesthetic appearance)
Tools needed
- Saw to cut wooden frames
- Power saw or a manual saw to get the right fit
- Drill and its accompanying drill bits
- Hammer
- Staple gun and heavy-duty staples
- Measuring tape to measure accurately
- Sandpaper or electric sander to smooth out the wood
- Screwdriver to assemble components
- Pencil to mark measurements
Step 1: Planning and Measurement
First, planning was a vital aspect of building my DIY pallet greenhouse. This included measuring the area in my backyard and calculating it to fit in an area that would measure 8 feet by 12 feet.
Once the size was agreed upon, I sketched the entire design in great detail to include space for plants, shelves, and even a small workspace. I chose a sloping roof to ensure proper drainage of rainwater and snow, which is important for the structure’s longevity.
We selected a sunny location for maximum light exposure and ensured it was level to provide a stable foundation. Ventilation was another key consideration, so we planned for a door and a small vent on the opposite wall.
This step also helped me determine the materials and tools I’d need, ensuring the project moved smoothly once I started. Planning and measurements are essential for avoiding costly mistakes and ensuring the structure meets your specific gardening needs.
Step 2: Budgeting the Project
The first reason I opted to build a DIY pallet greenhouse was to save money. Here is a summary of my expenditures:
- Pallets: Free; I got mine from local warehouses and stores.
- Clear plastic sheeting: $40
- Wooden beams and brackets: $50
- Hinges and screws: $15
- Weatherproof sealant: $20
- Paint and finishing materials: $25
- Total Cost: Approximately $150
This cost-effective method enabled me to make a greenhouse that was not only functional but also in line with my budget.
Step 3: Preparing the Pallets
I prepared each pallet before assembling them. I first cleaned the pallets to remove dirt and debris. This is a crucial step to ensure that the working process goes on smoothly and does not contaminate the plants.
After cleaning, we sanded the surfaces to eliminate splinters and rough edges, making it safe to handle and giving the wood a polished look. Next, we also checked for cracks or any signs of damage before discarding all those not sufficiently strong.
With the wood, I used the generous weatherproof wood sealant to keep water out of my pallet and further prolong the service life of each pallet. In doing this, I ensured that each side of the wooden pallet is adequately dry before proceeding.
Good pallet preparation goes to the overall survival of your Do-It-Yourself pallet greenhouse.
Step 4: Building the Base
A sound base was indispensable for the smooth success of the DIY pallet greenhouse. I initiated by leveling the grounds in the target area, as well as evacuating any kinds of rocks and uneven patches found there.
To help prevent weed growth, I utilized a weed barrier fabric, not to mention helping protect the inside plants from herbicides. I then stretched out the pallets on the ground and fastened them to each other with long screws and metal brackets.
Concrete blocks were added for stability at all the corners and edges of the greenhouse. This assured me that the base was level and tight, which is a solid foundation upon which the entire greenhouse would be based.
Finally, this step will ensure that your greenhouse stands and serves safely for a longtime.
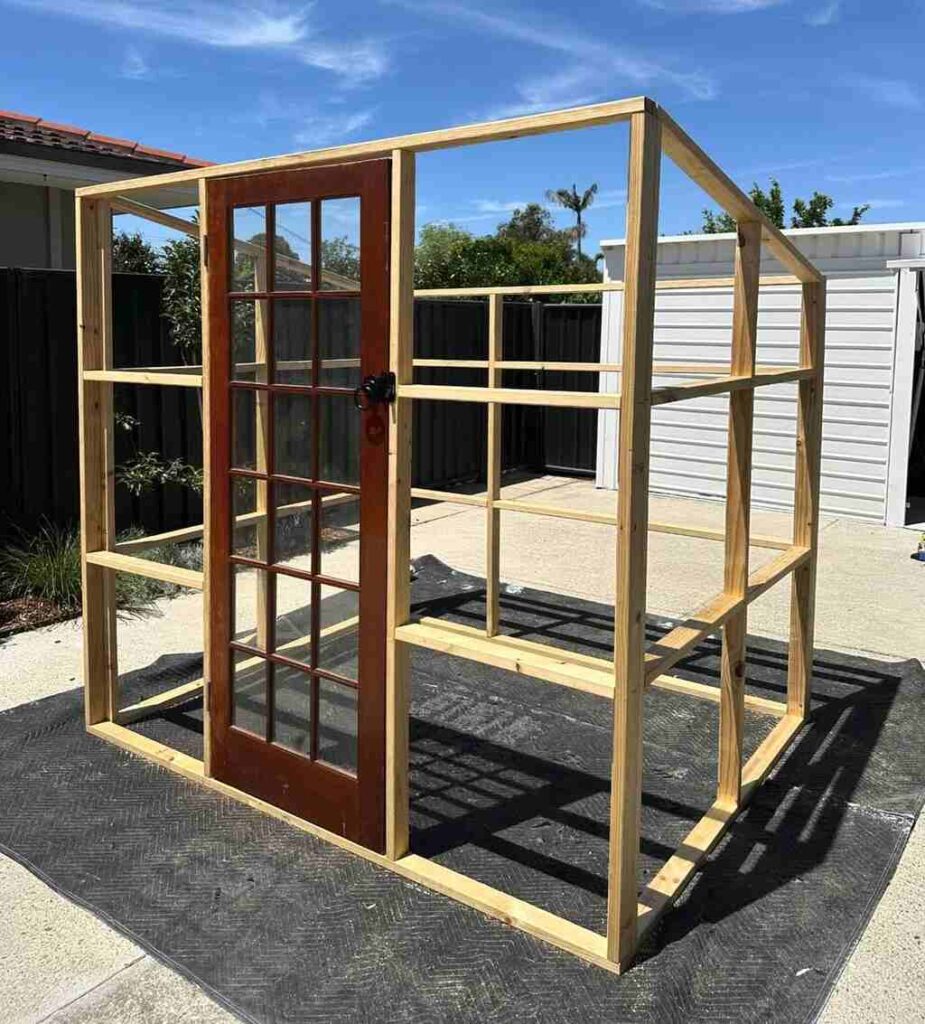
Step 5: Assembling the Sides
Standing pallets upright on the base was pretty thrilling. Pallets stood very carefully placed side by side and screwed, supported on metal brackets onto the base, which securely locked them down.
For adding support to this frame, brackets joined the pallet to palate in unbroken continuity for wall space. I left a gap on one side for the door and included a smaller opening on the opposite wall for ventilation.
Reinforcing the corners with extra brackets provided additional support, ensuring the walls would hold up against strong winds and other weather conditions. A well-constructed wall frame is critical for the overall stability of your DIY pallet greenhouse.
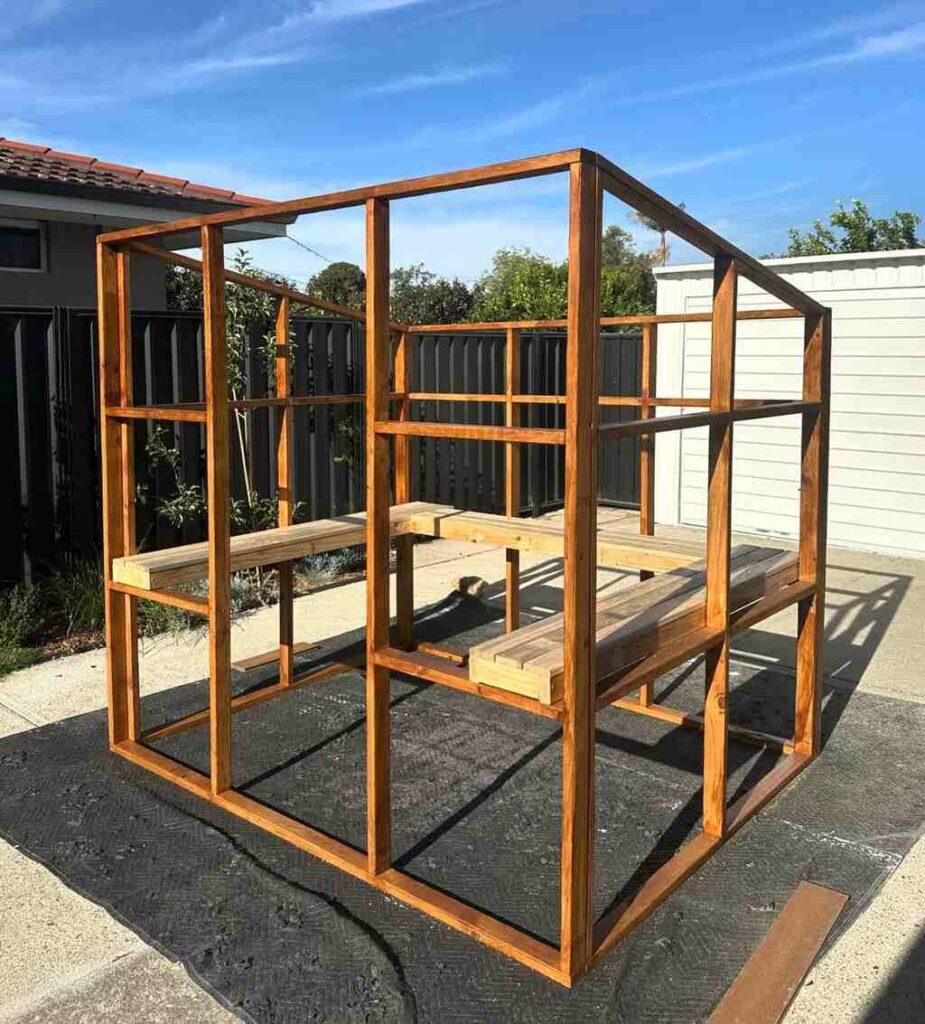
Step 6: Installing the Roof Frame
The roof frame was built with wooden beams cut at exact angles to give a sloping design. This slope, about 35 degrees, allows rain and snow to slide off easily, preventing any accumulation that could damage the structure.
I attached the beams at the top edges of the walls by using screws and brackets and made sure that they are nicely fixed. The added cross-support beams made sure to help evenly distribute the weights of the plastic sheeting and helped strengthen the roof.
A check on all connections made sure that your roof frame is stable. Once you have a solid roof frame, your greenhouse will surely stand up against the variation in the weather conditions.
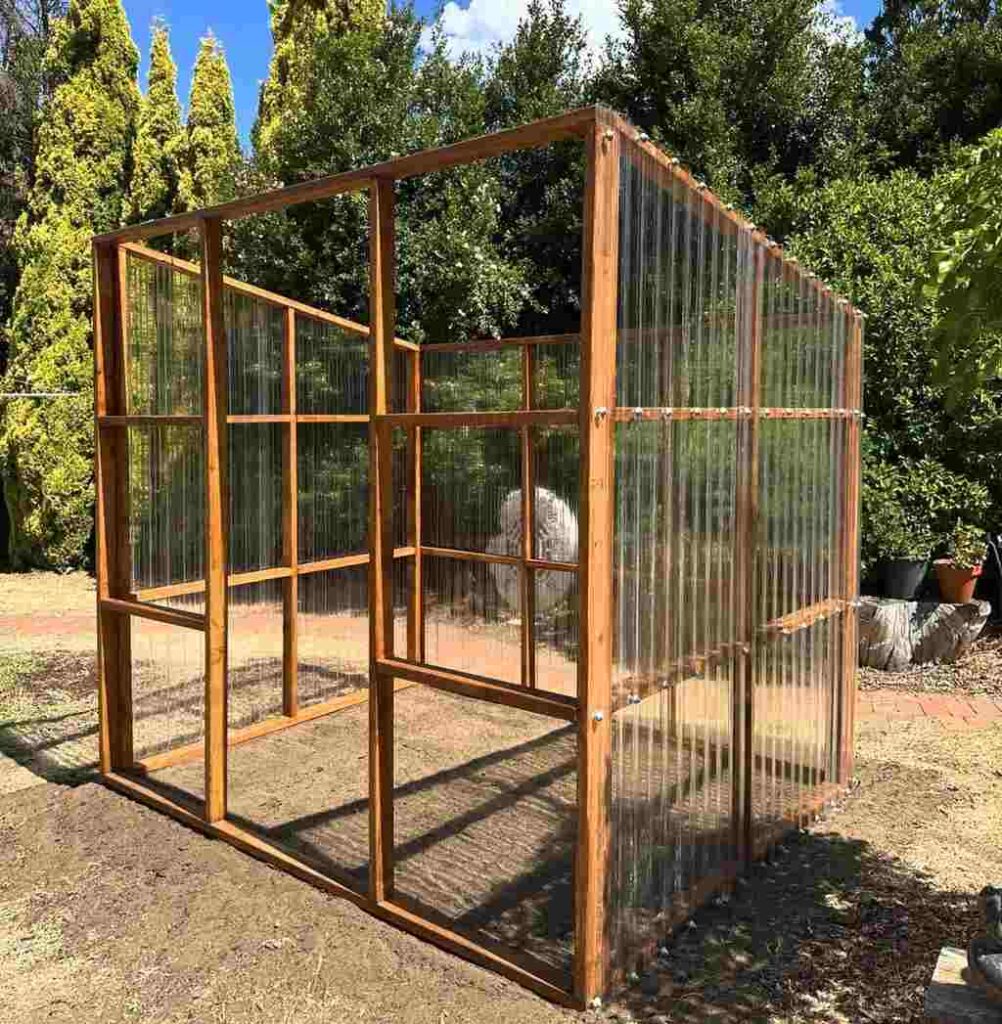
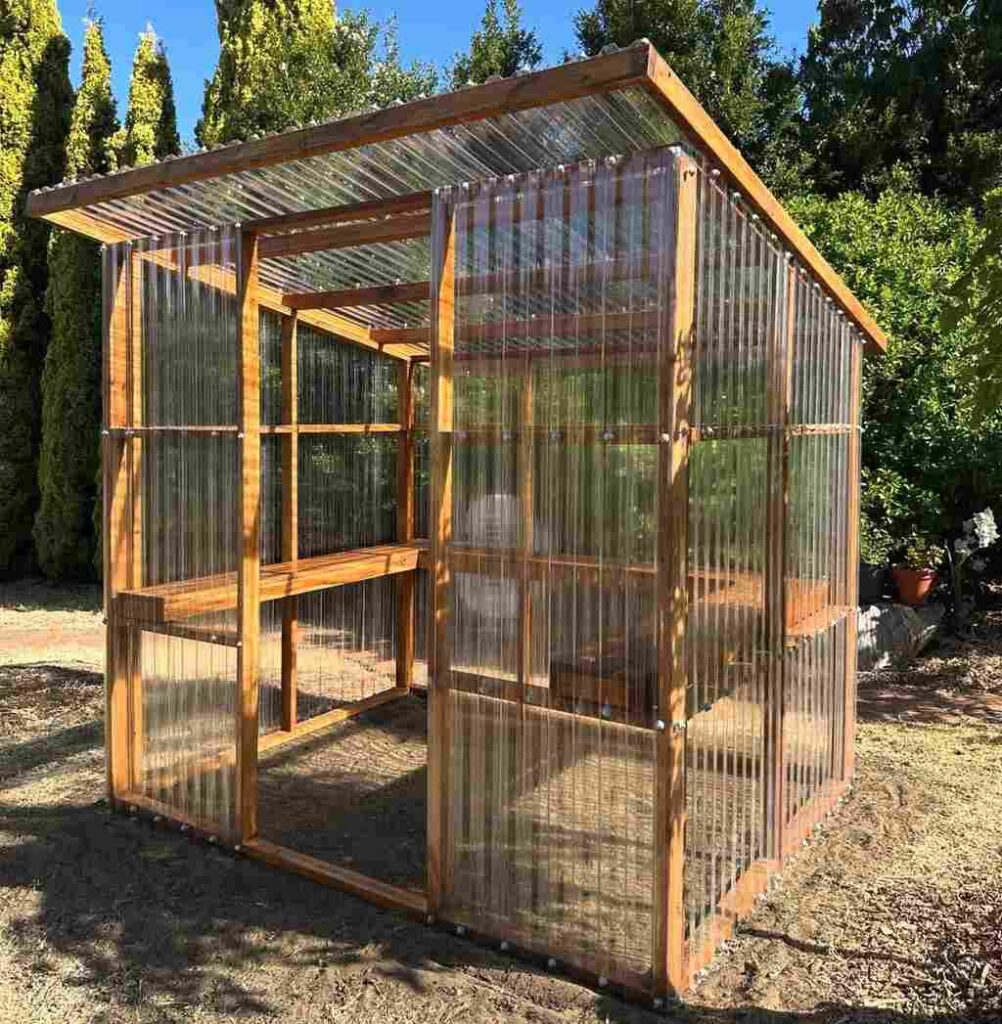
Step 7: Plastic Sheeting Covering
The clear plastic sheeting was what transformed the wooden frame into a functional greenhouse. I unrolled the plastic, starting with the roof, and then covered the walls, leaving enough overlap at the edges to secure it properly.
Using a staple gun, I attached the plastic tightly to the wooden frame, ensuring there were no gaps or wrinkles that could allow air or water in. I added wooden strips along the edges to prevent the plastic from tearing in high winds and nailed them over the plastic for extra reinforcement.
Trimming the excess sheeting gave the greenhouse a clean, professional appearance. Properly secured plastic sheeting ensures optimal insulation and protection for your plants.
Step 8: Door and Ventilation
The door was made from leftover pallet wood. I measured and cut the wood to fit the door opening, assembling a simple frame and attaching it with sturdy hinges.
Covering the door with plastic sheeting ensured it blended seamlessly with the rest of the greenhouse. Ventilation is very essential for a healthy growing environment.
I put up a small window frame on the back wall, and this vent can be propped open with a stick to help circulate fresh air, control temperature, and humidity inside this DIY pallet greenhouse. Proper ventilation helps prevent mold and promotes plant growth.
Step 9: Add Shelves and Finishing Touches
To make the most of the space, I added shelves made from scrap wood along the walls. These shelves provided ample room for potted plants, seed trays, and gardening tools.
I also included a small workbench for planting and organizing supplies, making the greenhouse both functional and convenient. I painted the pallets a cheery green for aesthetics and attached hooks for hanging tools.
It made my greenhouse not just practical but very pretty in the backyard. All those little adjustments like these can make your own DIY pallet greenhouse very unique.
Conclusion
Building my DIY pallet greenhouse was one of the most rewarding projects I’ve ever undertaken. It not only saved me money but also gave me the satisfaction of creating something with my own hands.
Today, it stands as a vibrant space where my plants thrive year-round, bringing life and joy to my backyard. With careful planning, attention to detail, and a bit of hard work, you too can create a DIY pallet greenhouse that transforms your gardening experience.
Whether you’re a seasoned gardener or a beginner, this project is worth every effort. Happy gardening!
FAQs
1. How long does it take to build a DIY pallet greenhouse?
The timeline depends on your experience and the availability of materials. It took me around two weekends to do this project.
If you’re doing it yourself, you can plan for an extra weekend preparing the materials and assembling the structure. If everything is prepared beforehand, then it’s a lot easier and faster to complete.
2. Can I build a DIY pallet greenhouse without power tools?
Yes, but the process is quicker and easier if you have a drill and saw as power tools. If power tools are unavailable, hand tools can be used, but with more effort and time.
A good alternative can be borrowing them from friends or renting them; this will cost less.
3. How do I maintain my DIY pallet greenhouse?
Regular maintenance is the key to the longevity of your greenhouse. Check the plastic sheeting for tears or wear and replace it when necessary.
Reapply waterproof sealant to the wood annually to protect it from moisture and rot. Keep the interior clean to prevent mold or pests. Check for stability after storms or heavy weather to ensure safety.
4. Can I customize the size of my DIY pallet greenhouse?
Absolutely! One of the best things about a DIY pallet greenhouse is its versatility. Adjust the number of pallets and dimensions to fit your available space and gardening needs.
Just ensure the structure remains stable and well-supported. Use additional beams or braces for larger structures to maintain durability.