
Transform your dining space by bringing the ocean breeze to your table with charming, coastal-inspired decor that captures the relaxed beauty of the seaside.
Creating beach-themed table decorations offers an affordable way to add seaside charm to any gathering, from summer parties and beach-themed weddings to casual backyard get-togethers with friends and family.
This comprehensive DIY guide provides step-by-step instructions for crafting beautiful table settings that evoke the tranquil atmosphere of coastal living.
With simple materials and creative techniques, you can design decorations that reflect the natural beauty of sandy shores, rolling waves, and ocean treasures.
These projects work perfectly for both indoor and outdoor events, bringing that coveted beachside ambiance to your home.
Why a Beach-Themed Table Decor Works for Any Occasion
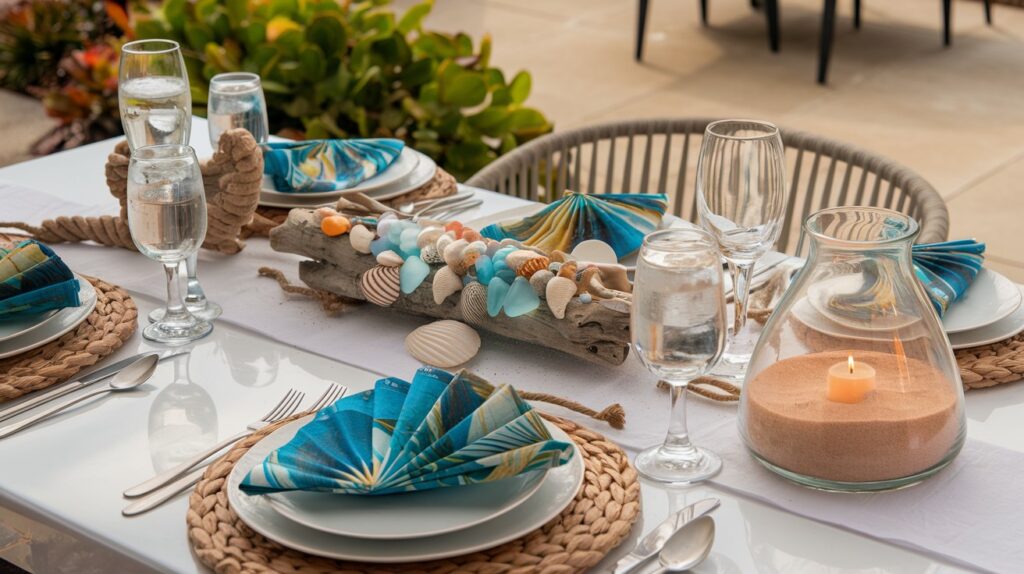
Beach-themed table decor brings a naturally relaxed coastal ambiance that instantly sets a laid-back, welcoming mood for guests.
This effortless style creates an atmosphere where people feel comfortable and at ease, making it perfect for fostering genuine connections and memorable conversations.
The beauty of coastal decor lies in its remarkable versatility for both indoor and outdoor events.
Whether you’re setting up on a patio for a sunset dinner, creating poolside party decorations, or transforming your dining room into a seaside retreat, beach-themed elements adapt seamlessly to any space.
The style is also incredibly easy to customize according to your preferences and occasion.
You can personalize your table setting with different color palettes ranging from soft pastels to vibrant tropical hues, incorporate various shells and sea glass, experiment with different textures like rope and driftwood, and create unique centerpieces using sand, candles, and coastal treasures.
This flexibility ensures your beach-themed table decor reflects your personal style while maintaining that coveted seaside charm.
Step-by-Step Guide: How to Make a DIY Beach Table Centerpiece
Materials Needed
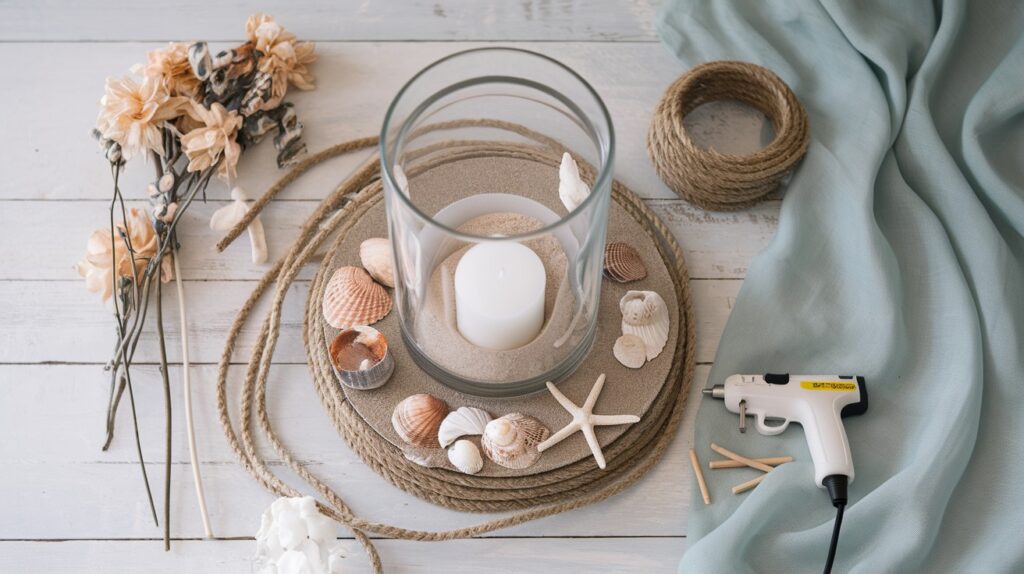
- Large glass cylinder vase
- Smaller glass vase (to nest inside)
- Sand
- Seashells and faux starfish
- Jute rope (approx. 2 cm thick)
- Pillar candle
- Dried flowers
- Glue gun and glue sticks
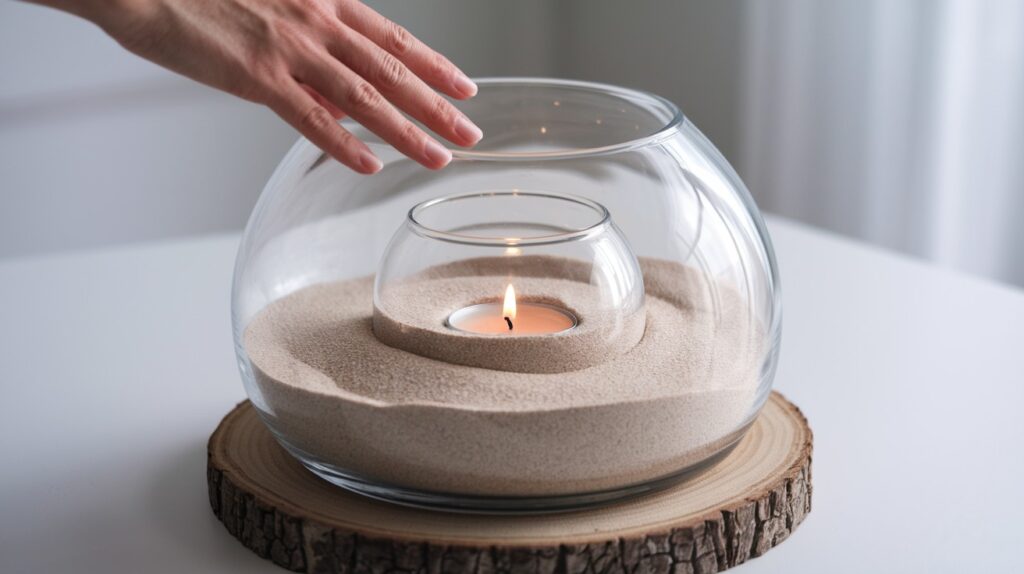
Step 1: Fill the Inner Vase with Sand and Candle
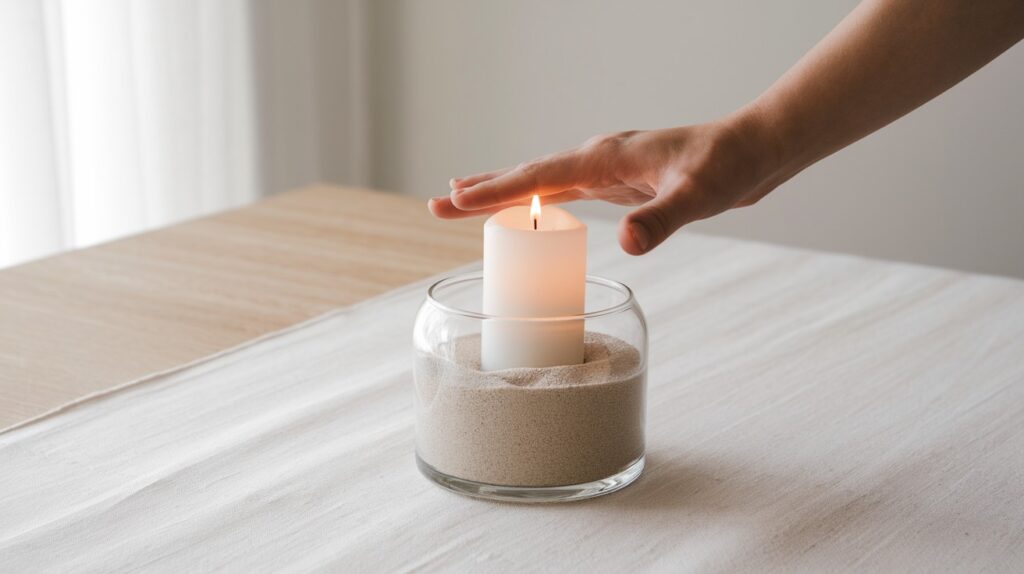
Begin by selecting fine, clean sand that will create a smooth, even surface in your small vase.
Pour the sand slowly to avoid air pockets, filling it about halfway to provide adequate stability.
Choose a candle that fits proportionally within the vase – pillar candles work best for this project.
Insert the candle into the center of the sand, pressing down gently but firmly to ensure it stands completely upright.
The sand should hold the candle securely without wobbling, creating a safe and attractive foundation for your centerpiece.
Step 2: Nest the Inner Vase into the Large One
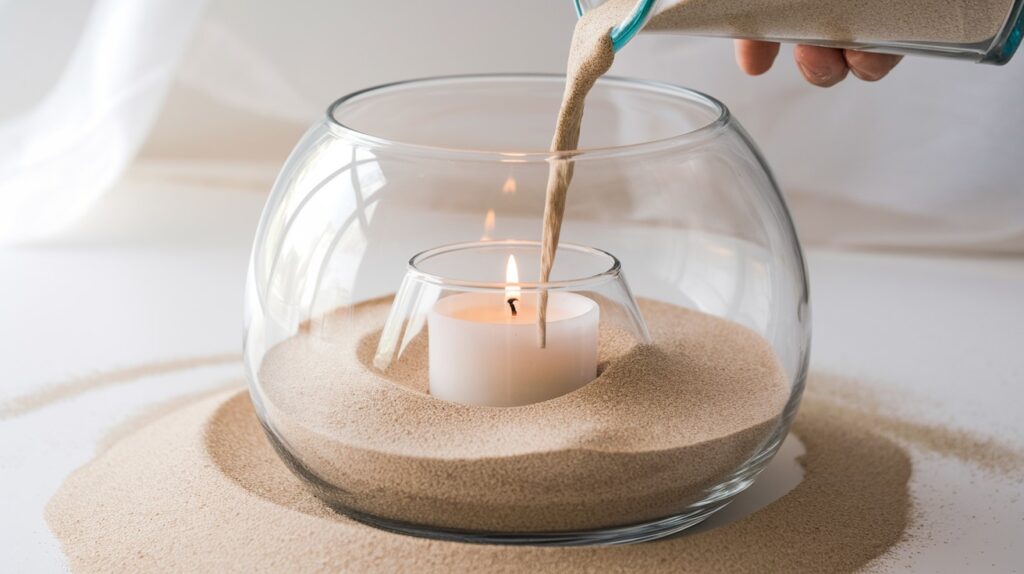
Carefully lower the prepared small vase into the center of your larger container, taking care not to disturb the sand or candle arrangement.
Position it so there’s an equal amount of space around all sides – this gap should be wide enough to accommodate decorative elements but not so large that it overwhelms the design.
The top of the inner vase should sit slightly below or level with the outer vase rim for the best visual balance and proportion.
Step 3: Add Sand Around the Base
Pour additional sand into the gap between the two vases, creating beautiful layered textures.
Fill slowly and deliberately, allowing the sand to settle naturally around the curves of the inner vase.
Tap the outer vase gently to help eliminate air bubbles and ensure even distribution.
The sand level should reach about two-thirds up the sides of the inner vase, providing enough surface area for your decorative elements while maintaining clean lines.
Step 4: Add Shells and Decorative Elements
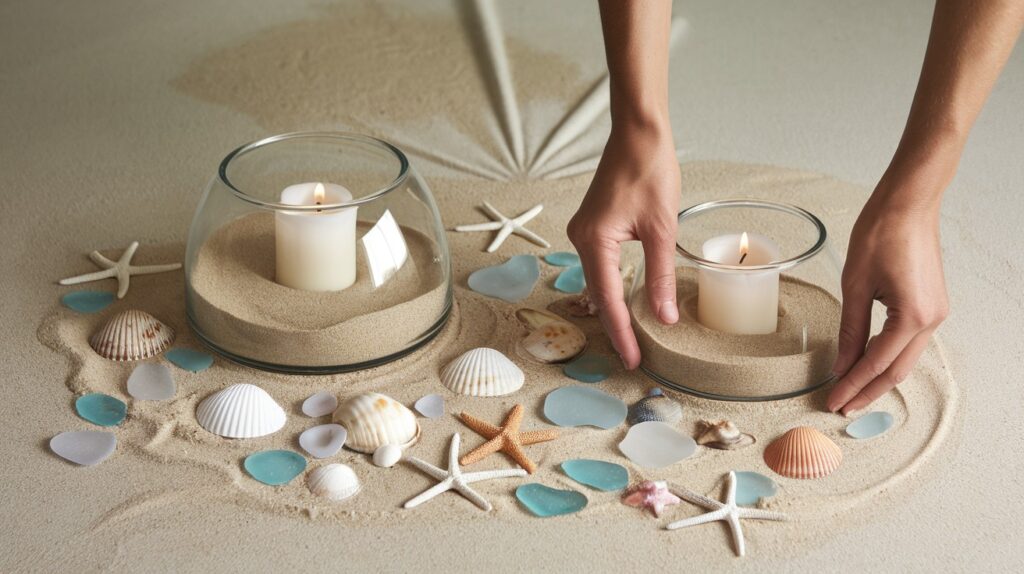
Arrange your collected seashells, starfish, sea glass, and other coastal treasures thoughtfully across the sand surface.
Vary the sizes and types for visual interest – mix larger statement pieces with smaller accent shells.
Place items at different heights and angles to create a natural, beach-combed appearance.
Consider color coordination with your overall table theme, and don’t overcrowd the space.
Leave some areas of sand visible to maintain balance and allow each decorative element to shine.
Step 5: Wrap and Decorate with Jute Rope
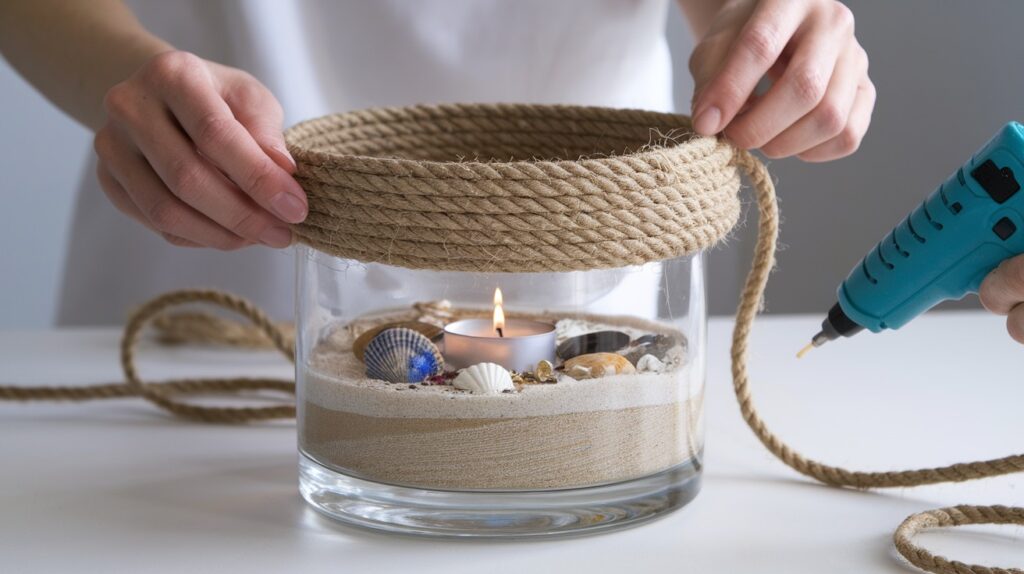
Measure enough jute rope to wrap around the vase rim 3-4 times with extra length for securing.
Starting at the back of the vase, wind the rope evenly around the top edge, keeping consistent tension for a neat appearance.
Overlap each layer slightly to create texture and depth.
Once you’ve achieved the desired coverage, trim excess rope and secure both ends with hot glue, pressing firmly until completely bonded.
Allow the glue to cool completely before handling.
Step 6: Attach Accents for a Finished Look
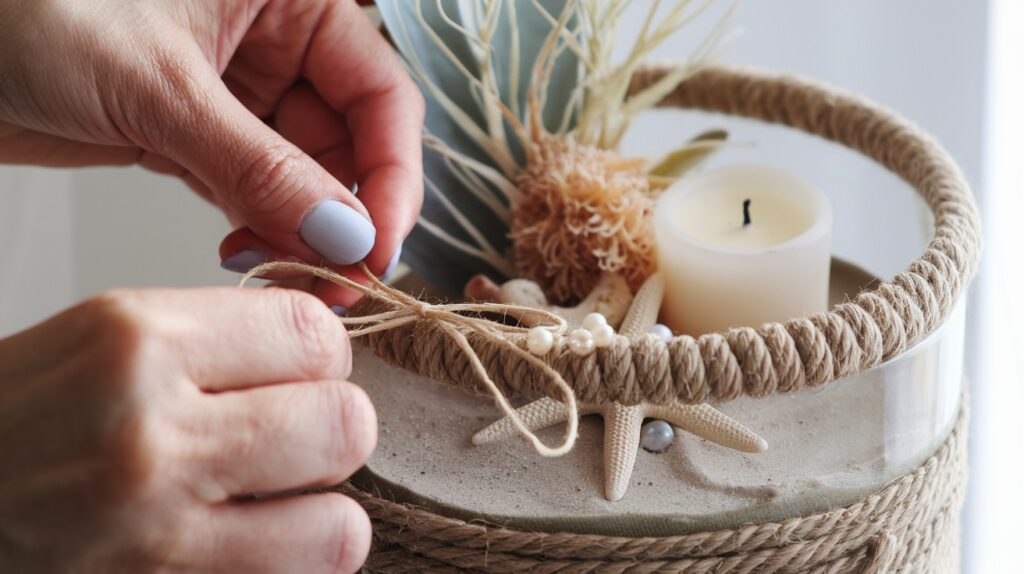
Create a charming finishing touch by tying a small bow with thin twine or raffia string.
Position this bow at the front or side of the vase where it will be most visible.
Tuck small dried flowers or sea grass under your starfish for added texture and natural appeal.
Complete the look by carefully gluing tiny shells or pearls to the rope ends using craft glue, creating cohesive details that tie the entire piece together beautifully.
Conclusion
Creating DIY beach-themed table decor offers a fun and affordable way to bring the tranquil vibes of the ocean into any gathering or celebration.
With just a few basic materials like sand, shells, candles, and rope, plus a touch of creative flair, you can design stunning tablescapes that genuinely impress your guests and transform ordinary meals into memorable coastal experiences.
These simple yet effective projects prove that beautiful decorations don’t require expensive purchases or professional expertise.
The relaxed atmosphere created by beach-inspired elements makes every occasion feel special and welcoming.
So gather your seashells, candles, and other coastal treasures, then let your creativity flow like the tide as you craft personalized decorations that capture the timeless appeal of seaside living.
Frequently Asked Questions
What materials do I need for DIY beach table decor?
You’ll need basic supplies like sand, seashells, candles, jute rope, and glass vases or containers. Most materials can be found at craft stores, dollar stores, or collected from actual beach visits.
Can I make beach table decor without real seashells?
Yes, craft stores sell artificial shells, starfish, and sea glass that work perfectly for these projects. You can also use painted rocks, coral replicas, or other coastal-themed decorative items as alternatives.
How long does it take to create a beach-themed centerpiece?
Most simple centerpieces take 30-45 minutes to complete once you have all materials ready. More complex arrangements with multiple elements may take 1-2 hours depending on your design choices.
Will sand get messy during the crafting process?
Some sand spillage is normal, but you can minimize mess by working over newspaper or a large tray. Use fine craft sand rather than coarse beach sand for easier cleanup and better results.
How can I make my beach decor work for different seasons?
Swap out seasonal elements while keeping the coastal base – add autumn leaves with shells for fall, or incorporate evergreen sprigs for winter. Adjust candle colors and ribbon choices to match your seasonal theme.