
Want a kitchen that looks expensive without breaking the bank? A 2 inch mitered edge countertop gives you that thick, luxury feel for less.
I’ve worked with dozens of homeowners on this exact style, and I know it can feel confusing at first. That’s why I created this guide.
You’ll learn what mitered edges actually are, how they’re made, the design benefits, installation steps, and how to care for them.
I’ll show you if this edge works for your kitchen remodel. By the end, you’ll know exactly what to ask your fabricator.
Let’s make this decision simple.
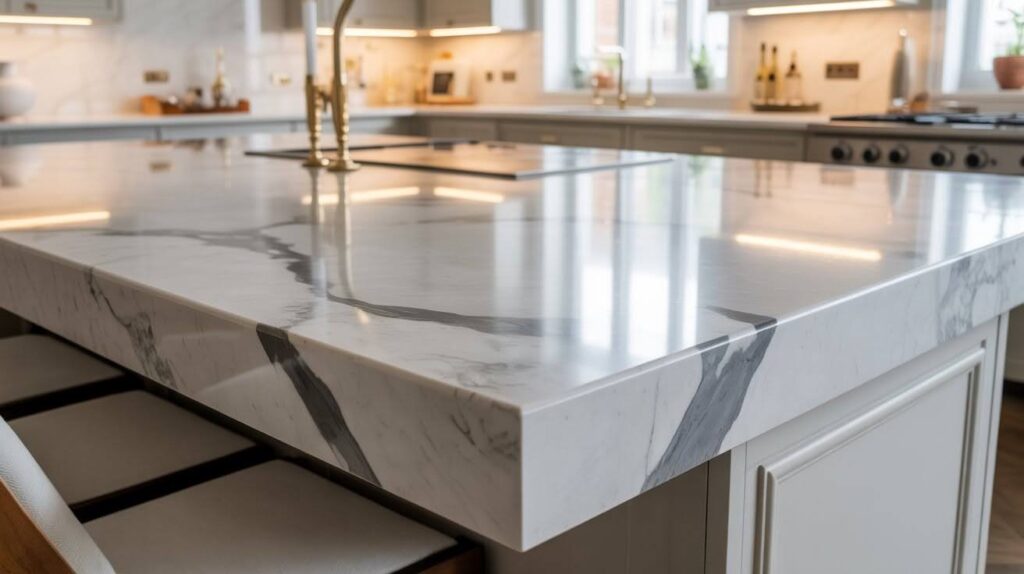
What Is a 2 Inch Mitered Edge Countertop?

A 2 inch mitered edge countertop isn’t actually 2 inches thick all the way through. It’s a clever design trick.
Fabricators take your standard countertop slab and add a strip along the edge. They cut both pieces at a 45-degree angle. Then they join them together seamlessly.
The result? Your counter looks like one solid, thick piece of stone.
You get the bold, substantial appearance without the extra weight. And you save money compared to buying a genuine 2-inch thick slab.
Most homeowners can’t tell the difference once it’s installed. The seam is nearly invisible when done right.
How a Mitered Edge Is Made

The process starts with precise measurements. Your fabricator needs to cut two pieces at exactly 45 degrees.
One piece is your main countertop surface. The other is a narrow strip for the edge.
When these two pieces meet, they form a perfect 90-degree corner. This creates what looks like a thick slab edge.
The fabricator applies strong adhesive to both angled cuts. They press the pieces together and add hidden supports for extra strength.
After the adhesive cures, they polish the seam. A skilled fabricator makes the joint disappear completely.
The finished edge shows continuous veining from top to side. It looks like one solid piece of stone.
Design Appeal of a 2 Inch Mitered Edge
This edge style changes ordinary counters into statement pieces.
Modern and Luxurious Look
A 2 inch mitered edge adds instant drama to any space. Your kitchen or bathroom feels more expensive.
The thick profile catches the eye. Guests notice it right away.
This edge works especially well on kitchen islands. The substantial edge makes your island feel like a centerpiece.
Modern designs love the clean, bold lines. Traditional styles benefit from the added visual appeal.
Seamless Veining and Edge Continuity
Natural stone has beautiful veining patterns. A mitered edge shows off these patterns perfectly.
The fabricator matches the veining from the top surface down to the side edge. This creates a continuous flow.
With quartz, you get consistent patterns that wrap around the corner. The effect looks intentional and polished.
Standard edges often show the plain cut side of the stone. Mitered edges hide that and showcase your material’s best features.
Versatility Across Styles
I’ve seen mitered edges work in many different kitchen styles.
Minimalist kitchens love clean geometry. The sharp angles fit perfectly.
Transitional spaces use mitered edges to bridge traditional and modern elements. The thick edge feels classic but looks contemporary.
Even traditional kitchens can pull off this look. Pair it with ornate cabinets for an interesting contrast.
The key is choosing the right stone color and pattern for your overall design.
Installation Process Explained
Professional installation involves three critical steps for lasting results.
Step 1: Precise Cutting and Mitering

The fabricator starts by cutting your countertop to exact dimensions. Every measurement must be perfect.
Next comes cutting the 45-degree angles. This requires specialized equipment and skill.
Even a tiny error in the angle creates visible gaps. Professional fabricators use computerized saws for accuracy.
They cut both the main slab and the edge strip at the same time. This ensures the angles match perfectly.
Step 2: Joining and Reinforcement
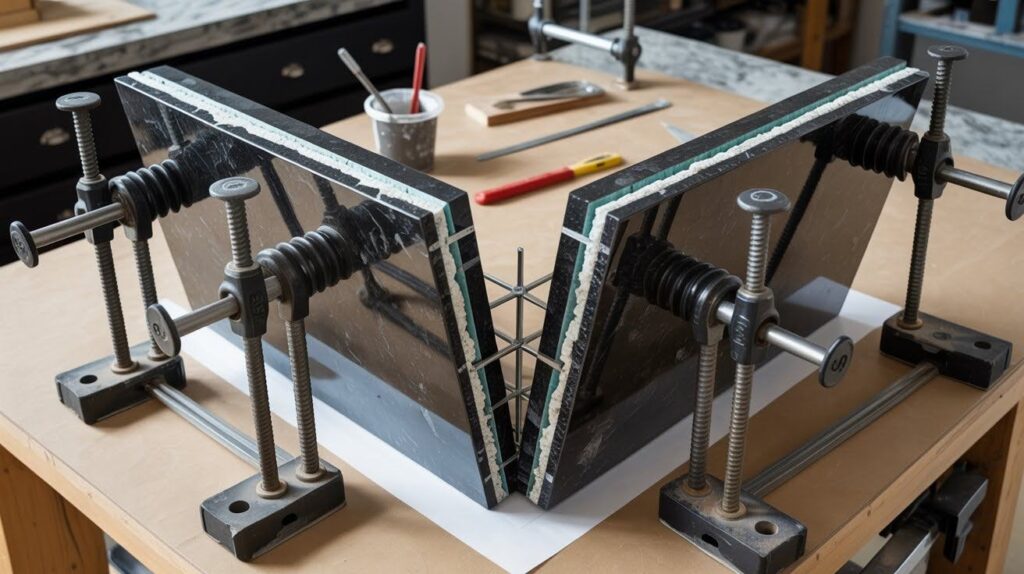
Now comes the critical bonding process. The fabricator applies special stone adhesive to both angled surfaces.
They press the pieces together carefully. The joint must be tight with no gaps.
Hidden supports go in next. These might be steel rods or mesh embedded in the stone.
The supports prevent the edge from sagging or breaking over time. You’ll never see them, but they’re doing important work.
Clamps hold everything in place while the adhesive cures. This can take several hours.
Step 3: Polishing and Finishing Touches
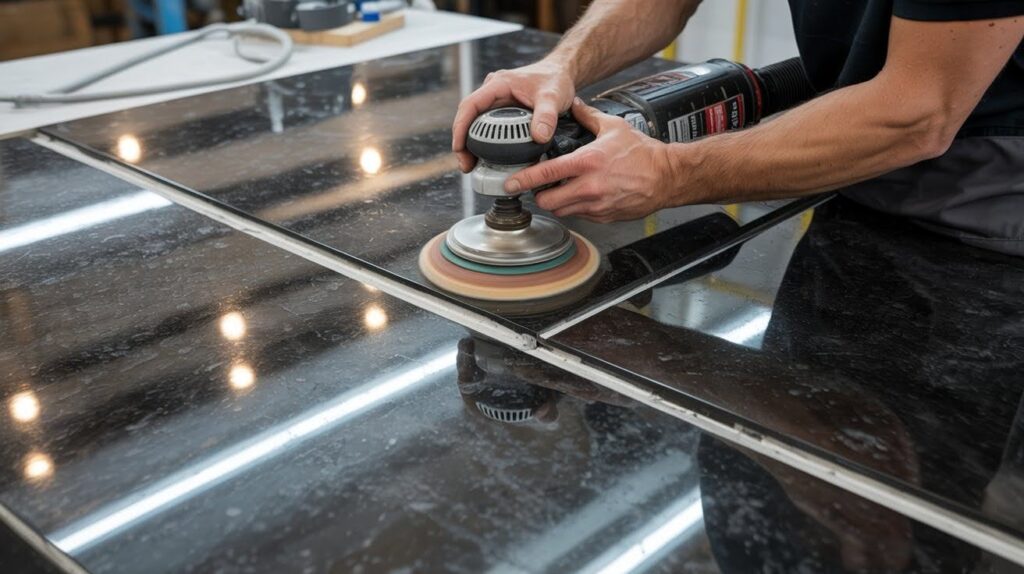
After the adhesive sets, the real magic happens. The fabricator polishes the seam until it disappears.
They use progressively finer polishing pads. The goal is making the joint invisible to the eye and smooth to the touch.
Any small gaps get filled with color-matched resin. This creates a waterproof seal.
The final polish brings out the stone’s natural shine. Your counter looks like one continuous piece.
A quality installation leaves no trace of the seam. You shouldn’t be able to feel where the pieces join.
Pros and Cons of a 2 Inch Mitered Edge Countertop
Understanding the benefits and challenges helps you decide if this edge suits your project.
Advantages
Sleek, custom-made appearance: Your kitchen looks professionally designed. The thick edge gives a high-end feel that standard edges can’t match.
Enhances property value: Buyers notice quality countertops. A well-done mitered edge can increase your home’s appeal.
Flexible thickness options: You’re not stuck with 2 inches. Some homeowners go with 3-inch or even 4-inch mitered edges for more drama.
The mitered edge also protects your cabinets better. The overhang keeps water and spills away from cabinet doors.
Potential Drawbacks
Requires expert fabrication: This isn’t a DIY project. You need a skilled fabricator with the right equipment.
Not all countertop companies do mitered edges well. The seam can be obvious if done poorly.
Higher cost than standard edges: Expect to pay more. The extra materials, time, and skill add to your bill.
Most fabricators charge between $40 and $100 extra per linear foot for mitered edges. Your total cost depends on the material you choose.
The edge can also be more vulnerable to chipping at the seam. Heavy impacts right on the corner might cause damage.
Maintenance and Care Tips
Proper care keeps your mitered edge looking new for years.
- Clean your counters with mild soap and warm water for both granite and quartz surfaces.
- Avoid harsh or acidic chemicals near the seam as they can damage the adhesive over time.
- Wipe up spills quickly and don’t let liquids sit on the surface, especially near the mitered joint.
- Never place heavy objects directly on the edge corner since the seam is the most vulnerable part.
- Always use a cutting board and never cut directly on the stone, especially near the mitered seam.
- Reseal granite counters every year or two to protect against stains, but quartz counters don’t need sealing.
- Avoid setting hot pots near the mitered edge and call your fabricator if you notice the seam opening up or feeling rough.
Conclusion
When I installed my first 2 inch mitered edge countertop on my kitchen island, I couldn’t stop running my hand along that thick, seamless edge. It completely changed how my space felt.
This edge style gives you real luxury without breaking the bank on solid slabs. Yes, it costs more than standard edges, but that bold look makes your kitchen feel intentionally designed.
Ready to upgrade your counters? Visit local fabricators, touch the samples, and see the difference in person.
Drop a comment below if you have questions about your remodel, I’d love to help!
Frequently Asked Questions
Is a 2 inch mitered edge worth the extra cost?
Yes, for most homeowners. The thick edge creates a custom, high-end appearance that increases your kitchen’s appeal and potentially your home’s value.
Can any countertop material be used for mitered edges?
Most materials work, but quartz and granite are best due to their strength and pattern consistency. Your fabricator can advise which materials suit this edge style.
How long does it take to install a mitered edge countertop?
Installation takes one to two days. The fabrication process before installation requires one to three weeks for templating, cutting, and preparation.
Will the seam on a mitered edge be visible?
When done by a skilled fabricator, the seam should be nearly invisible. From normal viewing distance, it disappears completely.
How do I maintain the seam on my mitered edge countertop?
Clean gently with mild soap and water. Avoid harsh chemicals, don’t place heavy objects on the corner, and wipe spills promptly.