
Thinking about upgrading your driveway?
You’re not alone. Many homeowners face the same dilemma when their old driveway starts cracking or becomes a muddy mess every time it rains.
Here’s the good news. A gravel driveway might be exactly what you need.
Why gravel? It’s budget-friendly. It lasts for years. And here’s the best part – it practically takes care of itself.
No more standing water after storms. No more worrying about your car getting stuck. Your neighbors will notice the difference, too.
Ready to get started?
We’ll walk you through each step. From choosing the right materials to laying that final layer. By the end of this guide, you’ll have a driveway that works as hard as you do.
Let’s build something great together.
Step-by-Step Guide to Build a Gravel Driveway
Follow this simple process to create a functional gravel driveway that provides years of reliable service for your home.
Step 1: Design Your Driveway
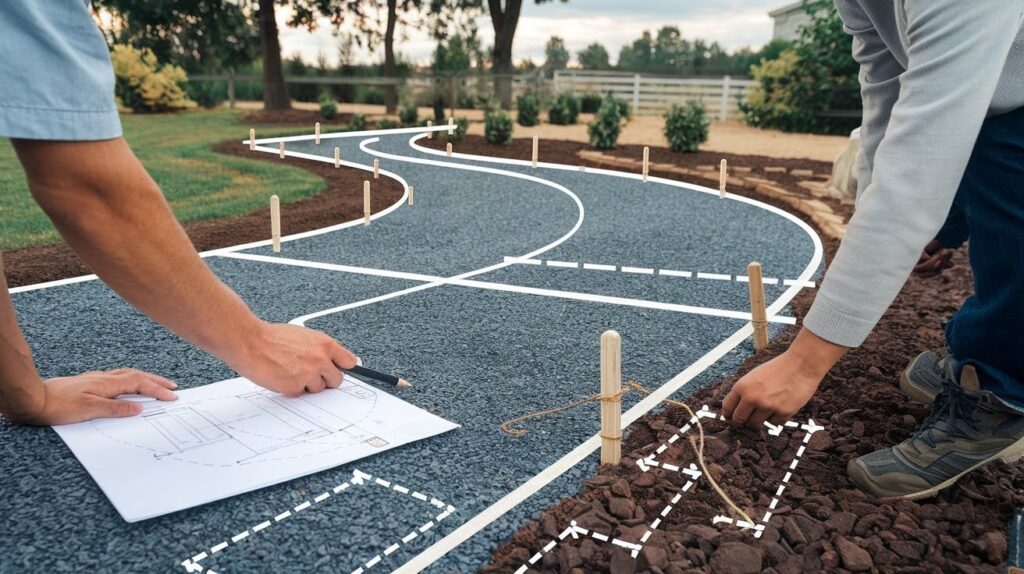
Stop right there. Before you grab a shovel, you need a plan. Think of this like cooking. You wouldn’t start without a recipe, right?
Get a piece of paper. Draw your driveway. Why sketch first? You’ll see problems before they happen. That tight curve might look fine in your head. On paper? Not so much.
Mark where the cars will enter. Add any curves or turns. Don’t forget space for backing out. Walk the route with a friend. Have them pretend to drive while you watch for tight spots.
Here comes the math part. Don’t worry – it’s simple. Measure your driveway length and width. Note any slopes. You’ll need road base for the foundation, gravel for the top layer, and filter fabric. Write these numbers down for ordering materials.
Step 2: Layout the Driveway

Time to take your plan outside. This step turns your drawing into reality.
Grab some stakes and string. Or use spray paint if you prefer. Mark the exact edges of your driveway. Make it visible. You don’t want to guess where the boundaries are halfway through digging.
Look around your marked area. See any bushes in the way? Trees that need to go? Rocks that will cause problems? Remove them now. Check that cars have enough room to turn around. It’s easier to fix spacing issues now than later.
Step 3: Grade the Area
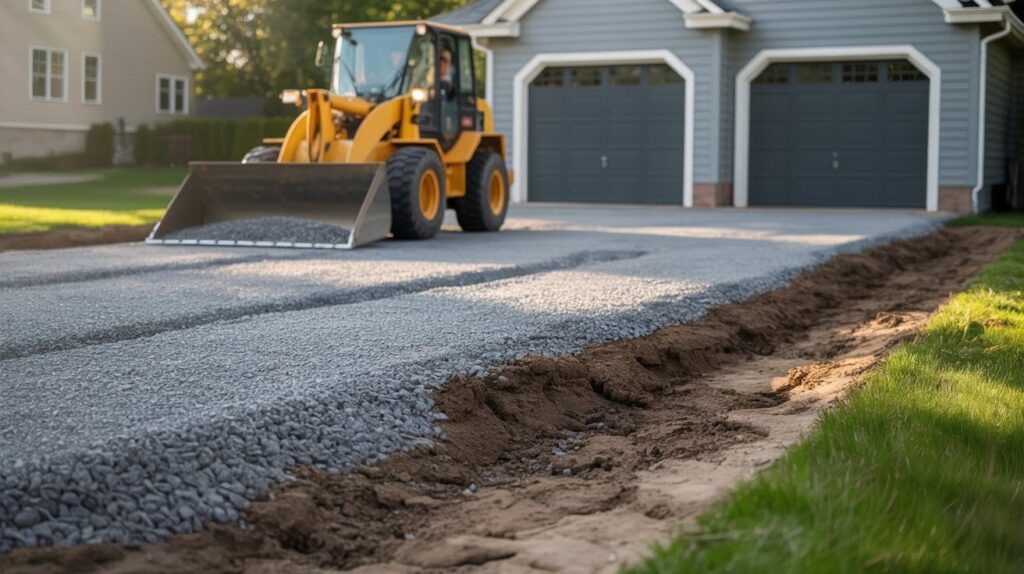
This is where the real work starts. But don’t worry – you’ve got this.
All that grass has to go. So does the topsoil underneath. Organic material rots over time. That means your driveway will sink and crack. Remove everything until you hit solid ground.
Here’s where you decide – rent equipment or do it by hand. A loader or backhoe makes quick work of this step. Manual tools take longer but save money. Dig down about 8 inches. Level everything as you go.
Water is your enemy. Make sure your driveway slopes away from your house and garage. Even a small slope works. Consider adding berms or small ponds to control water flow during heavy rains.
Wait. Before you dig anything, call 811. They’ll mark underground utility lines for free. You don’t want to hit a gas line or power cable.
Step 4: Install Underlayment

This step prevents future headaches.
Roll out filter fabric over your prepared area. This fabric stops gravel from mixing with dirt underneath. It also blocks weeds from growing up through your driveway. Don’t skip this step. You’ll regret it later.
Use landscape stakes to hold the fabric in place. Put some temporary gravel on top if it’s windy. You want the fabric to stay put while you work.
Step 5: Order and Place Gravel
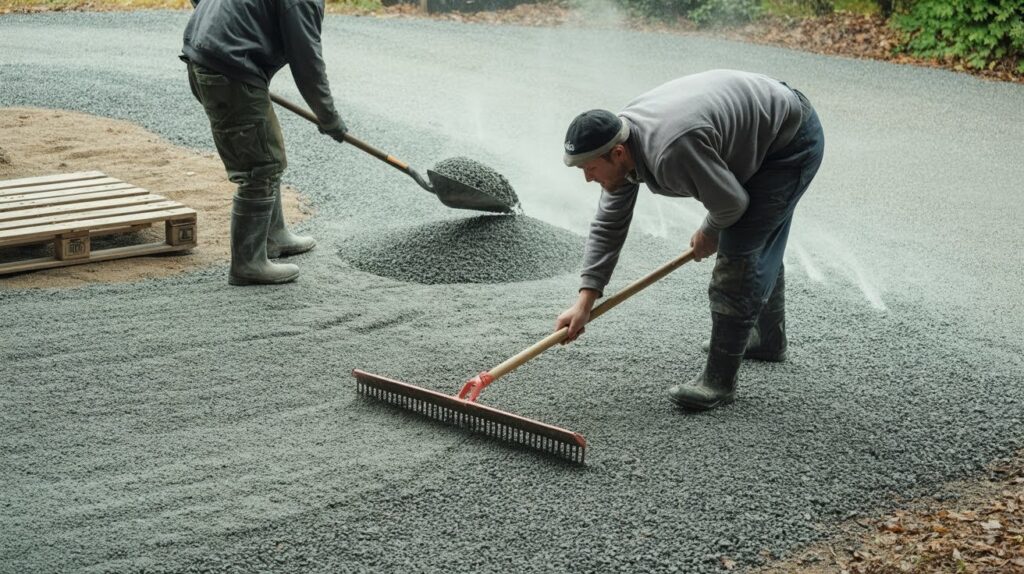
The fun part begins. This is when your driveway starts looking like a real driveway.
Not all gravel works the same. You need a mix of different-sized rocks and fine particles. This is called road base. The small particles fill gaps between larger rocks. This creates a solid, stable surface.
Here’s the formula: Length times width times depth divided by 27 equals cubic yards. Most driveways need about 3 to 4 inches of gravel total. Order 10% extra. You’ll be glad you did.
Start spreading gravel with shovels and rakes. Work in small sections. Level each area before moving to the next. You can use a pallet or a piece of chain link fence as a makeshift leveler. Lightly spray water on the gravel to control dust. Don’t soak it.
Step 6: Compact the Gravel
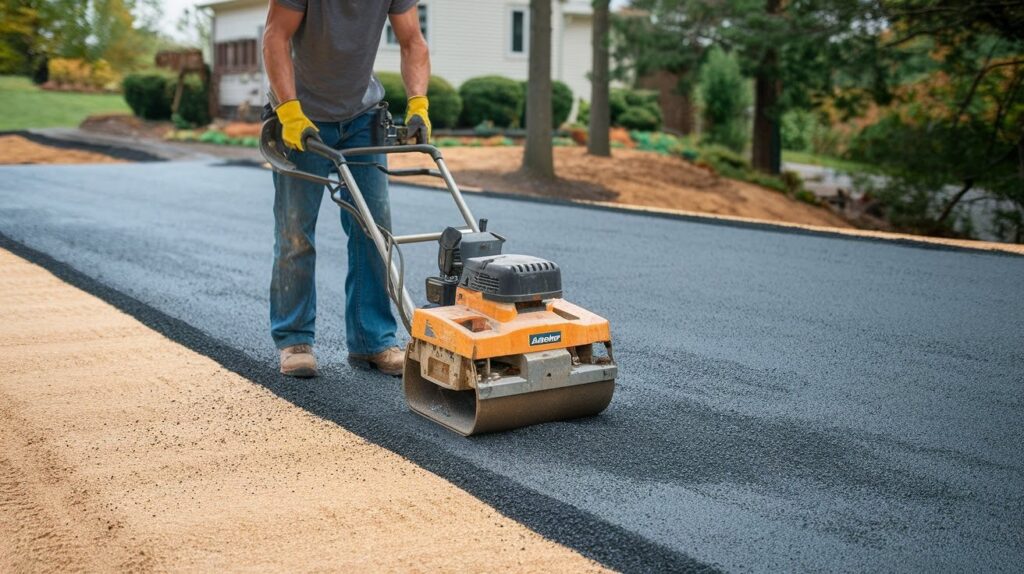
This step turns loose gravel into a solid driveway.
Compaction creates a stable surface that lasts for years. Without it, your gravel will shift and create ruts. Cars will sink into loose gravel. Don’t skip this step.
Rent a vibrating plate compactor. Run it over the entire driveway in overlapping passes. Go lengthwise along the driveway. The machine does the work – you just guide it. Wear gloves, safety glasses, and ear protection. These machines are loud.
Step 7: Accessorize Your Driveway

Time for the finishing touches that make your driveway special.
Add large rocks along the edges for a natural look. Consider yard art or decorative posts. These elements give your driveway personality and help define the space.
Solar pathway lights are easy to install. Low-voltage lighting works too if you want something brighter. Lighting makes your driveway safer at night. It also looks great from the street.
Create dry river beds along the sides of your driveway. These slow down stormwater and add visual interest. Use different colored rocks to create patterns.
Maintenance Tips for Gravel Driveways
Your driveway isn’t done once you finish building it. But here’s the good news – maintenance is simple.
- Check every few months: Look for low spots where gravel has shifted. Add new gravel where needed. Rake it level again to keep your surface smooth.
- Control weeds early: Pull them by hand or use an herbicide. The filter fabric helps, but some persistent weeds still break through.
- Inspect after heavy rains: Walk your driveway and look for erosion or water pooling. Fix drainage issues right away before they get worse.
- Compact annually: Run your plate compactor over the driveway once a year. This keeps the surface firm and prevents loose gravel from scattering.
- Clear debris regularly: Remove leaves and organic material. They break down and create mud. A quick sweep or rake makes all the difference.
Conclusion
You’ve just learned how to build a gravel driveway from start to finish. Seven steps that take you from planning to a finished surface you can be proud of.
Here’s what you’re getting. A driveway that lasts for years without breaking your budget. One that handles heavy rains better than concrete. And you can make it look exactly how you want.
I’ve built dozens of these driveways over the years. The ones that look great five years later? They all have one thing in common. Regular maintenance.
So here’s my challenge to you. Stop putting off that driveway project. You know now. You know the steps. Your tools are waiting.
Start this weekend. Your future self will thank you every time you pull into that smooth, solid driveway.
Frequently Asked Questions
How much does it cost to build a gravel driveway?
Most gravel driveways cost between $1-3 per square foot for materials. A typical 20×50-foot driveway runs about $1,000-3,000, depending on gravel type and local prices.
How long does a gravel driveway last?
A properly built gravel driveway lasts 10-15 years with regular maintenance. The key is using quality road base and compacting it well during installation.
What type of gravel works best for driveways?
Road base or crusher run works best because it contains mixed sizes from large rocks to fine dust. The fine particles bind everything together for a stable surface.
How thick should the gravel layer be?
Plan for 3-4 inches of compacted gravel total. Apply it in two layers – a base layer and a finish layer – compacting each one separately.
Can I build a gravel driveway myself?
Yes, most homeowners can handle this project with basic tools and equipment rental. The biggest challenge is moving and compacting the gravel, but it’s manageable with patience.