
Is your living room feeling too small for your needs? Adding more space to your main gathering area can transform how your home feels and works. Living room additions have become a top choice for homeowners who want to improve their homes without moving.
In this article, I’ll show you 10 practical and beautiful living room addition ideas that can fit your style and budget. These options will help you create the space your family needs, from simple extensions to complete transformations.
A thoughtfully designed living room addition not only gives you more room to relax and entertain but also increases your property value. As home design experts with over 15 years of experience, we understand what makes a living room both functional and appealing.
I created this guide specifically for homeowners looking to expand their living space in ways that make sense for real families and real homes.
Stunning Living Room Addition Ideas
Here are some living room addition ideas that will elevate your space:
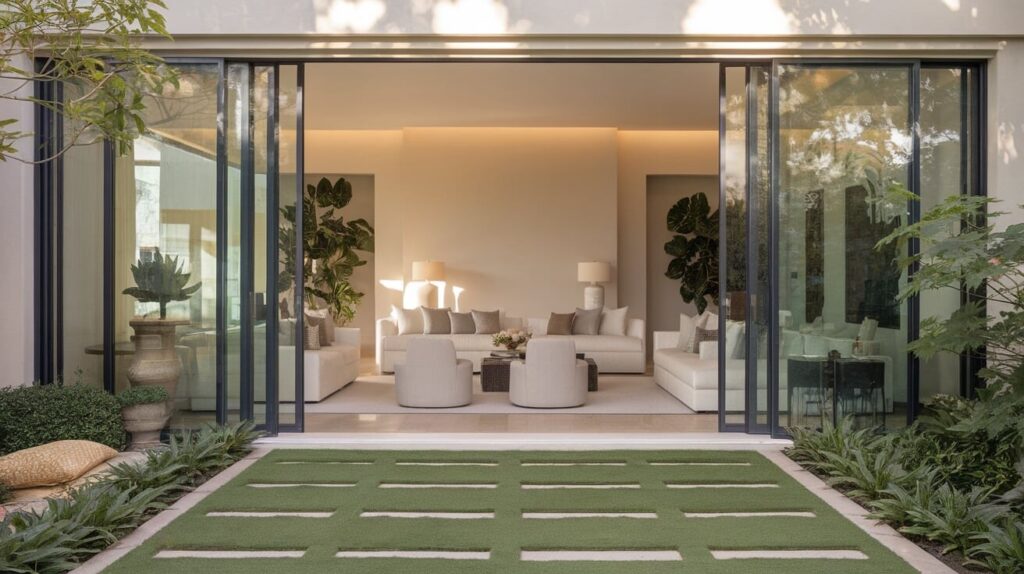
1. Extend Into the Backyard
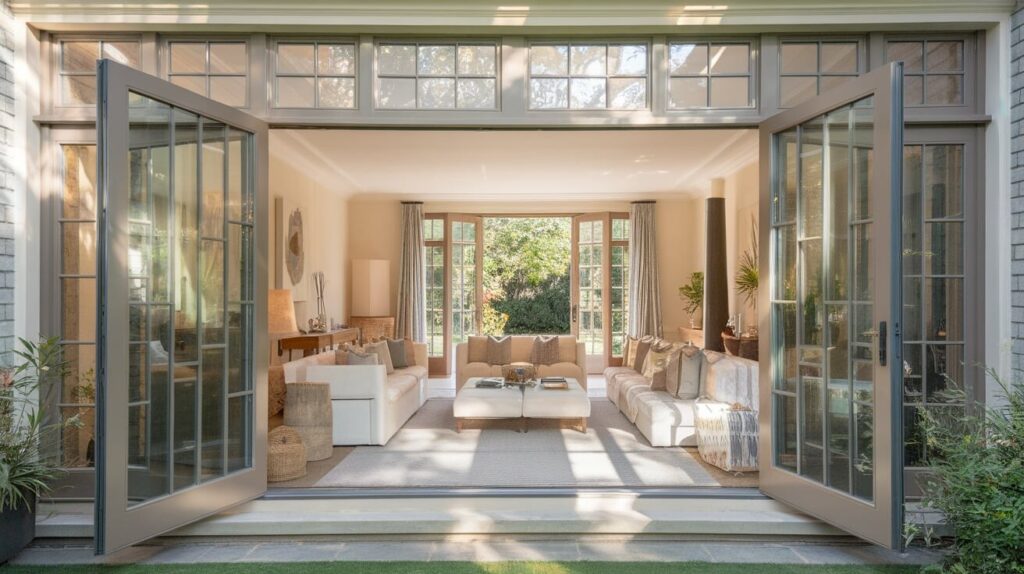
Glass walls or sliding doors create a smooth flow between indoor and outdoor areas. I’ve found they bring in natural light and make rooms feel bigger. You can enjoy garden views while staying comfortable inside.
For year-round use, consider a sunroom conversion. Add proper insulation with double-pane glass and think about heating options like radiant floors for winter comfort. Window treatments help control light and temperature throughout the seasons.
The best backyard extensions let you enjoy nature without leaving home. A good contractor can help you design a space that works in any weather.
How to incorporate it: Start by checking local building codes and permits. I recommend matching floor levels between your existing living room and the new space to create a smooth flow.
Use similar materials and colors to make the addition look like it was always part of your home. If budget allows, include HVAC connections so your new space stays comfortable year-round. For smaller budgets, consider a partial extension with just one glass wall as your first step.
2. Knock Down Non-Load-Bearing Walls
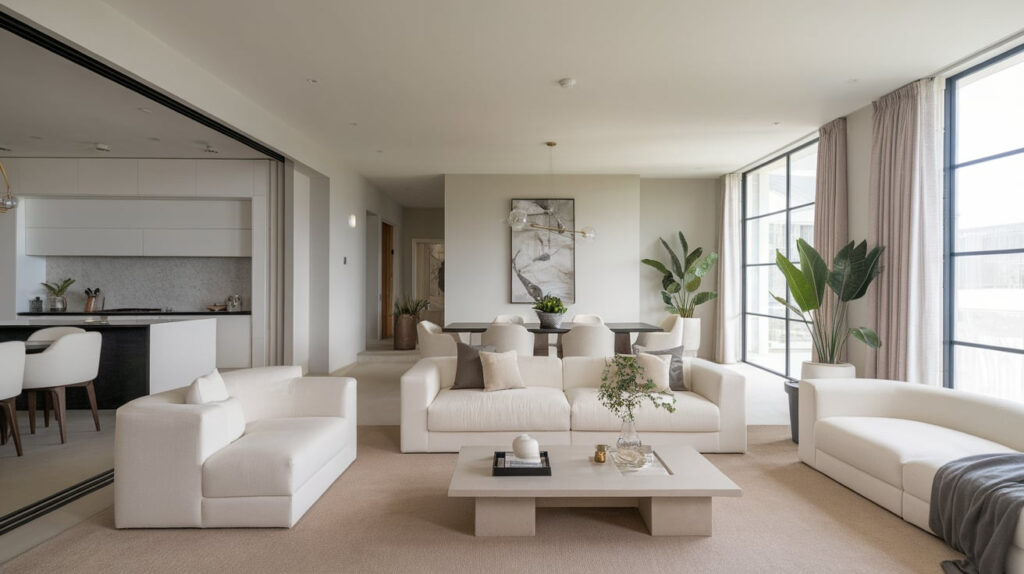
Opening up what you already have can make your living room feel bigger without adding square footage. I recommend removing walls between your kitchen, dining area, and living room to create one flowing space.
Safe walls to remove are typically thin, run parallel to floor joists, and don’t contain plumbing or electrical panels. When in doubt, hire a structural engineer; it’s worth the $500 to avoid costly mistakes.
For load-bearing walls, incorporate structural beams as replacements. Your contractor will install temporary supports before adding steel or wooden beams across the opening. These can become design features: leave wooden beams exposed for warmth or box in steel beams with decorative wood.
How to incorporate it: Start with a floor plan drawing to visualize the new flow. Use furniture, lighting, and area rugs to define different zones in your open space. Consider adding ceiling treatments that distinguish areas without walls.
Consult with professionals about HVAC adjustments, as heating and cooling an open space differs from separate rooms. Keep some storage solutions to replace lost wall space-floating shelves or islands can help maintain function while opening up your view.
3. Build Up With a Loft-Style Addition
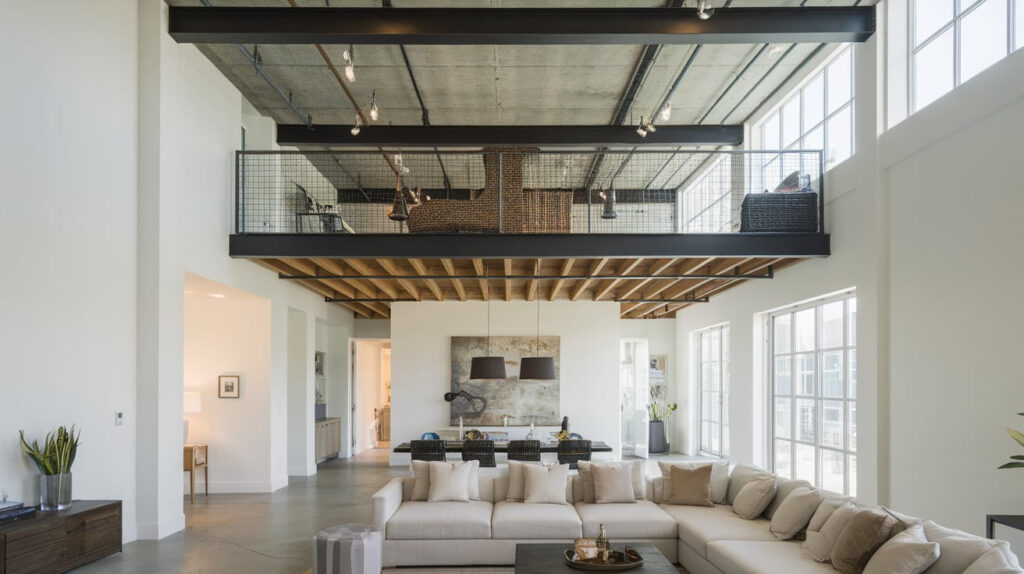
If your living room has high ceilings, consider going up instead of out. I’ve found that loft additions make clever use of vertical space that’s often wasted. You can turn this area into a reading nook, home office, guest space, or kids’ play area that stays connected to the main room.
For comfort, allow at least 7 feet of clearance below the loft and 6 feet above it. Safety is critical; have a structural engineer check that your walls and floor joists can handle the weight before you start planning.
How to incorporate it: Begin with a professional consultation to assess your ceiling height and wall strength. Install proper stairs or a ladder that meets local codes. Spiral staircases often work well in tight spaces. Use glass railings or open slats to maintain visual connection and light flow between levels.
Consider adding a small window or skylight to the loft area. For permits, visit your local building department early in the process, as many areas have specific requirements for adding interior structures. Expect to spend $180-250 per square foot for a properly built loft that adds value to your home.
4. Convert an Attached Garage
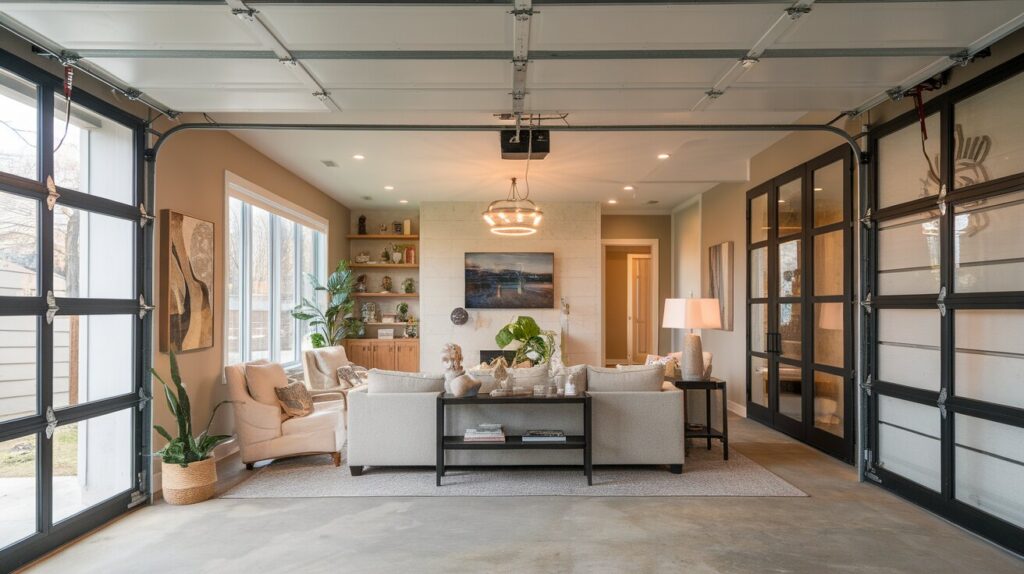
An attached garage offers ready-made space for a living room expansion. I’ve found that a well-executed garage conversion can add significant living space without the cost of a brand-new addition.
Blend design elements by raising the floor to match your home’s level, using consistent flooring, trim, and wall colors. Proper insulation is crucial-add R-13 minimum in walls and consider replacing the garage door area with an insulated wall. Sound control matters too, so include acoustic treatments to prevent echo.
Your converted garage can serve as a media room, game area, guest lounge, or combination space. Multi-purpose functionality comes from flexible furniture like sleeper sofas and storage ottomans that adapt to different needs.
How to incorporate it: Start by checking local building codes. Many areas require permits for garage conversions. Plan for additional electrical outlets beyond what a typical garage offers. Install proper windows for natural light, as most garages have minimal openings. Consider a separate HVAC zone or mini-split system for temperature control.
Address the concrete floor by either raising it with a subfloor system or using thick area rugs over sealed concrete. For the garage door opening, you can create a feature wall or install French doors for additional light and access.
5. Add a Bay Window or Bump-Out
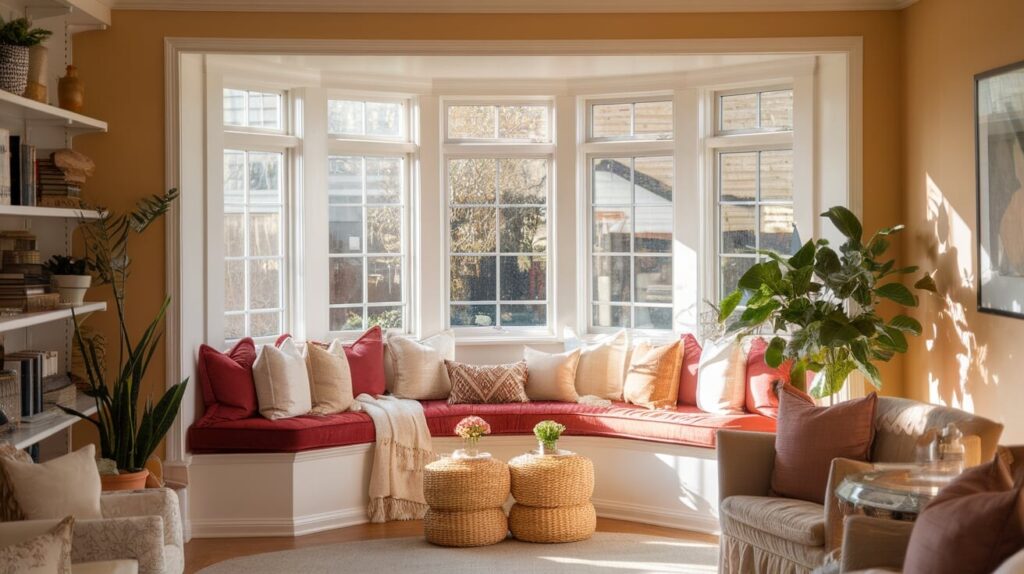
Bay windows and bump-outs offer a smaller-scale living room addition that still makes a big impact. I’ve found they add valuable square footage without the cost or complexity of a full addition.
These space-saving and stylish features extend just 2-3 feet from your existing wall, enough room for a reading nook, small desk, coffee corner, or built-in storage with seating. The extra space feels substantial while keeping construction simpler.
Design with natural light in mind by positioning your bay window facing south or west for maximum sunlight. Quality windows matter here, as this area will feature glass prominently.
How to incorporate it: Start by identifying the best wall for your bump-out, typically one with good views and sun exposure. Check with local building authorities, as these projects usually require permits but often fall under simpler guidelines than full additions. Work with a contractor who specializes in window installations to ensure proper support and weatherproofing.
Consider adding a window seat with storage drawers beneath. For comfort year-round, choose energy-efficient glass and add a small roof extension above to manage summer sun. Budget between $1,500-5,000, depending on size and window quality.
6. Use Prefabricated Room Extensions
Prefabricated room extensions offer a quicker alternative to traditional living room additions. I’ve found they install in days rather than months while costing 10-20% less than conventional construction.
These faster, cost-effective builds reduce on-site labor, minimize weather delays, and create less construction waste. Most prefab extensions run $100-300 per square foot compared to $150-400 for standard construction.
Modern prefab options include extensive customization choices for windows, siding, roofing, and interior finishes that can closely match your existing home’s look and feel.
How to incorporate it: Begin by measuring your available space and checking local zoning regulations, as some areas have specific rules about prefab structures. Prepare the site with a proper foundation-typically a concrete slab or pier foundation. Take photos of your home’s exterior and interior details to help manufacturers match materials and styles.
Consider access issues for delivery, as prefab units arrive on large trucks and may require a crane for placement. Plan for utility connections in advance-your contractor will need to connect electrical, plumbing, and HVAC to your existing systems. For a seamless transition, add matching trim work and consistent flooring between your existing space and the new addition.
7. Incorporate Built-In Storage

Built-in storage helps your living room feel larger by reducing clutter while adding character. I’ve found that smart storage solutions can transform a space without major construction.
Maximize functionality by using wall space effectively. Floor-to-ceiling bookcases, media cabinets, window seats with storage, and hidden drawers all help contain items while looking intentional and clean.
Dual-purpose furniture makes your space work harder: coffee tables with drawers, storage ottomans, wall benches, and Murphy beds with built-in sofas serve multiple functions while saving space.
How to incorporate it: Start by identifying problem areas where clutter accumulates in your living room. Measure these spaces carefully, including height, width, and depth. Consider hiring a carpenter for fully custom-built-ins ($300-1,000 per linear foot) or look into semi-custom options from home improvement stores for budget-friendly alternatives.
For built-ins around fireplaces or windows, match the trim style to your existing moldings. Use the same paint color as your walls for a seamless look, or choose a complementary accent color to create visual interest. Add proper lighting-puck lights or LED strips-to highlight books and decorative items. Include a mix of open shelving and closed storage to balance display space with clutter control.
8. Add a Fireplace or Focal Feature
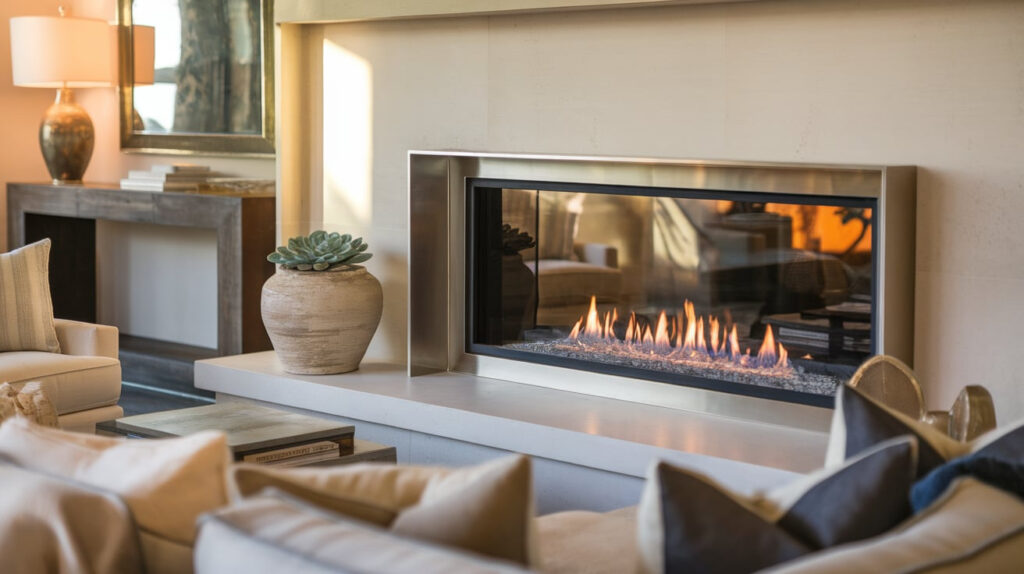
A fireplace or strong focal point creates a center of attention in your living room. I’ve found that these features give purpose to a space and make it feel complete.
Boost visual interest with electric fireplaces (easiest, from $400), gas models (clean-burning, $2,500-$5,000), or traditional wood-burning options. Non-functioning decorative fireplaces with candles or LED inserts can also create a cozy atmosphere without the complexity of real flames.
Complement with accent walls using stone veneer, shiplap, bold paint colors, or subtle wallpaper to create depth and texture behind your focal point.
How to incorporate it: Place your fireplace or focal feature where it will be seen immediately upon entering the room. For fireplaces, check local building codes first. Ventless options have different requirements than vented ones. Plan your furniture arrangement around this feature, typically in a U or H-shaped layout facing the focal point. If installing an electric fireplace, ensure you have proper electrical capacity nearby.
For gas options, you’ll need a gas line installed if one doesn’t exist. Keep the wall treatment simple on other walls to prevent visual competition. Add lighting that highlights your focal feature, recessed lights or sconces can draw attention to texture and detail. Budget for both the feature itself and the surrounding finish work, as wall treatments often cost $15-25 per square foot installed.
9. Upgrade Lighting and Ceiling Design
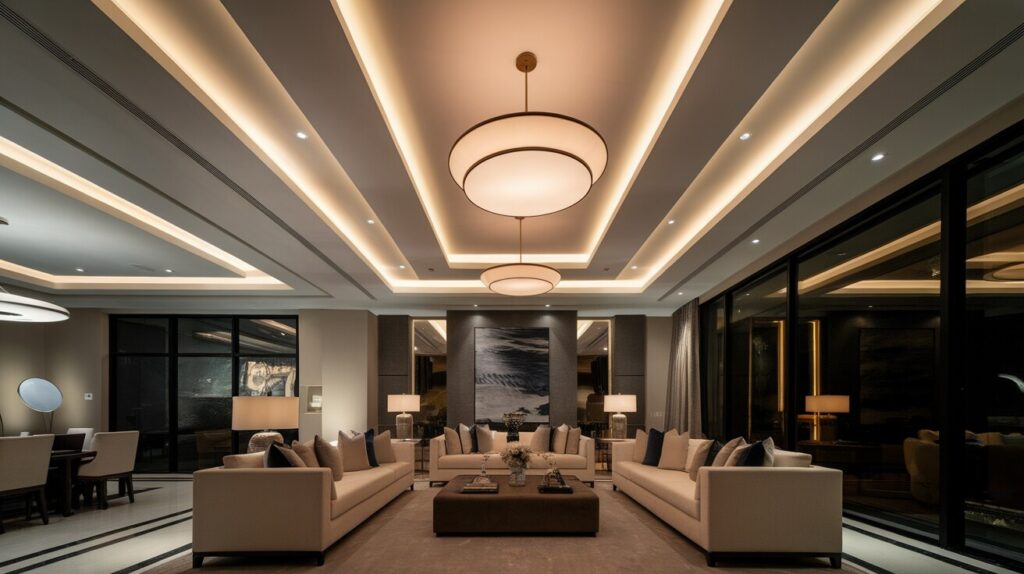
Changing what’s overhead can transform your living room without moving walls. I’ve found that lighting and ceiling improvements create dramatic changes with relatively modest investments.
Layered lighting techniques combine ambient lighting (overall brightness), task lighting (for reading or activities), and accent lighting (to highlight features). This mix creates flexibility for different moods and needs. Smart lighting systems add convenience, letting you control brightness and color from your phone.
Statement ceilings like coffered designs, wooden beams, bold paint colors, or decorative tiles draw the eye upward and make spaces feel larger and more custom.
How to incorporate it: Begin with a lighting plan that maps out fixture locations based on how you use the space-place task lights near reading chairs and accent lights near artwork or architectural features. Install dimmer switches for flexibility.
For ceiling upgrades, consider your ceiling height first; coffered ceilings work best with higher ceilings (9+ feet), while paint and simple trim work well with standard heights.
If you like the beam look but worry about weight or cost, hollow beam covers offer the same visual impact at a fraction of the price. When painting ceilings, choosing a shade lighter than your walls creates the illusion of height. Plan for professional installation of ceiling features and new electrical work, but consider DIY options for simpler upgrades like paint or lightweight ceiling tiles.
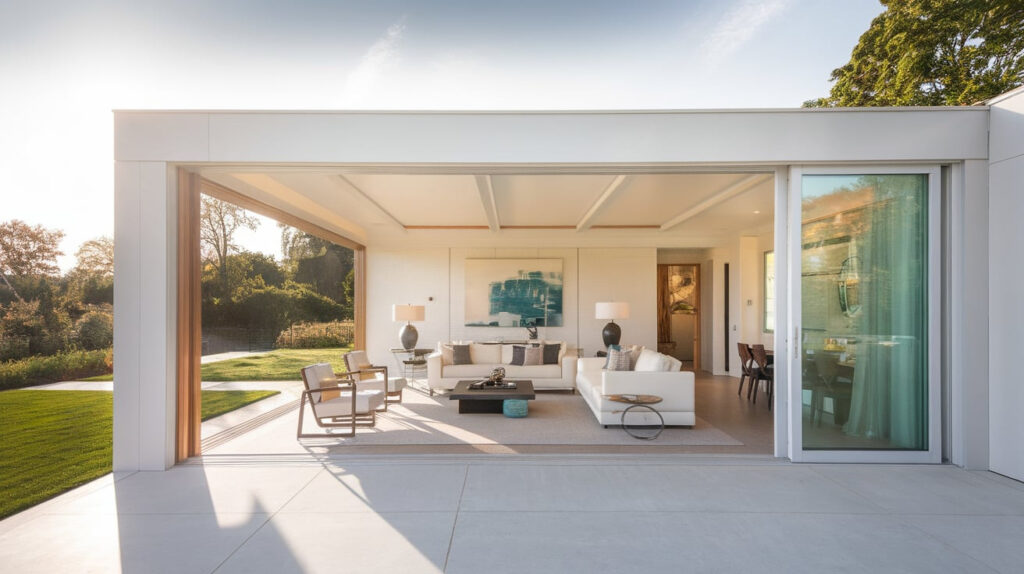
10. Blend Indoor and Outdoor Living
Connecting your living room to outdoor spaces effectively doubles your living area without major construction. I’ve found this approach gives you more room for entertaining and relaxing with minimal structural changes.
Install bi-fold or French doors to create a seamless transition between your living room and patio. These large openings transform how you experience your home, making both indoor and outdoor spaces feel larger. Look for quality doors with good insulation, secure locking systems, and proper weatherproofing.
Outdoor living room extensions like covered patios with comfortable furniture, outdoor rugs, and heating options function as natural expansions of your indoor space.
How to incorporate it: Start by evaluating which wall offers the best connection to your yard or patio-ideally, one with good views and natural flow. Check local building codes, as door installations usually require permits. Make sure floor levels match or plan for a smooth transition between surfaces. For weatherproofing, select doors with low-E glass and proper insulation ratings for your climate.
Match materials and colors between your indoor and outdoor spaces for visual continuity. Consider extending your flooring material outdoors (or use an outdoor version that looks similar). Add a permanent or retractable roof over the patio area to increase usability during different weather conditions. Install outdoor lighting that complements your indoor fixtures, and include power outlets for convenience.
Tips for Planning Your Living Room Addition
Planning makes the difference between a stressful project and a smooth one. Here’s what I’ve learned from helping homeowners through this process:
Budget considerations: Most living room additions cost between $20,000-$70,000+. Foundation work takes 25-35% of your budget, materials 20-30%, labor 30-40%, and design/permit fees 5-15%. Always add a 15-20% buffer for unexpected issues.
Work with professionals: Find an architect or designer for proper plans, a licensed contractor with additional experience, and possibly a structural engineer. Check references, ask about timeline accuracy and budget management, and get at least three bids.
Permit requirements: Visit your local building department early to learn about necessary permits, setback requirements, and height limits. For HOA approval, review community guidelines first and submit professional plans that match neighborhood aesthetics.
Sustainable choices: Consider energy-efficient windows, LED lighting, locally sourced materials, low-VOC paints, and smart thermostats. These options cost more upfront but save money over time while improving comfort and air quality.
Conclusion
Living rooms can grow and change in so many ways. I hope these ten ideas have shown you that you don’t need to move to get more space – your current home has potential.
The best choice depends on your budget, timeline, living habits, and home structure. What matters most is creating a space that works for your family.
Start small if you’re unsure. New lighting or built-in shelving can make a big difference while you plan larger changes. When you’re ready for more, talk with professionals who can guide you to the options best suited for your specific home.
Remember, these additions do more than add space-they make your home work better for the life you want to live.